
HP Enterprise Virtual Array 6400/8400 Expansion Rack Reference Guide (5697-1818, March 2012)

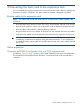
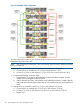
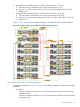
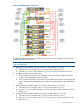
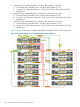
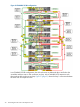

Figure 22 EVA6400 2C6D configuration
To connect the 0C6D expansion rack (with two loops and three disk enclosures per loop) to an
EVA6400 multi-product main rack:
NOTE: After connecting one cable pair, verify every aspect of the connection before proceeding
to the next cable pair.
1. Unplug DP1-A on controller A from P1 (I/O-A) on disk enclosure 1 (S-1) and:
a. Connect DP1-A on controller A to P1 (I/O-A) on disk enclosure 7 (S-7).
b. Connect P1 (I/O-A) on disk enclosure 1 (S-1) to P2 (I/O-A) on disk enclosure 9 (S-9).
2. Complete the following verification steps:
a. Verify that the I/O module on the added disk enclosure has been assigned an index
number of the next highest enclosure number.
b. In HP Command View EVA, verify that the newly added disk enclosure is listed under the
array hardware in the Navigation pane and the I/O module displays a good operational
status.
3. Unplug DP2-A on controller A from P1 (I/O-A) on disk enclosure 4 (S-4) and:
a. Connect DP2-A on controller A to P1 (I/O-A) on disk enclosure 10 (S-10).
b. Connect P1 (I/O-A) on disk enclosure 4 (S-4) to P2 on disk enclosure 12 (S-12).
c. Repeat Step 2.
24 Connecting the main rack to the expansion rack