
HP Enterprise Virtual Array 6400/8400 Expansion Rack Reference Guide (5697-1818, March 2012)
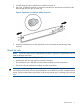
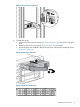
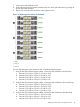

1. On the rear of the rail, squeeze the scissor latch (1, Figure 7 (page 12)) together to insert the
rail and pins through the rack holes (2) until the latch engages.
Figure 7 Attaching the rear rail
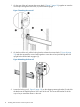
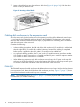
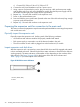
2. On the front of the rail, pull the locking latch to release the scissors latch (1, Figure 8 (page
12)) and then squeeze the scissor latch together to insert the rail and pins through the rack
upright holes until the latch engages (3).
Figure 8 Attaching the front rail
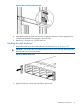
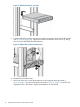
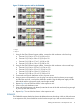
3. Loosen the locking nut (1, Figure 9 (page 13)) on the shipping retaining bracket (2) and slide
the bracket to the farthest position on the rear of the rail. This moves the bracket out of the
way to let you install the chassis in the rails.
12 Installing disk enclosures into the expansion rack