
HP Enterprise Virtual Array 6400/8400 Expansion Rack Reference Guide (5697-1818, March 2012)
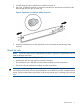
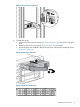
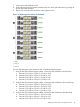

1. Locate the bag of eight round-hole pins included in the rail kit.
2. Use a No. 2 Phillips screwdriver to remove the standard pins from the front and back of the
left and right rails (four pins on each rail).
Figure 6 Square hole to round hole cabinet conversion
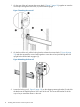
3. Insert the round-hole pins into the eight holes on the rails where the standard pins were
removed.
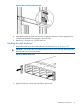
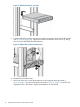
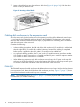
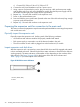
Attach the rails
NOTE: The left and right rails are designated by the letters R (right) and L (left) stamped into the
metal on the front of the rack.
Consider the following when installing the rails:
• Installing the rails does not require any tools for assembly.
• HP recommends you install all the rail kits before installing any other components.
• Ensure the rails are level before installing any other components.
WARNING! Before you begin, ensure that the rack is sufficiently stable. If provided, lower the
rack leveler feet and make sure any required stabilizers are installed. If provided, extend the anti-tip
device. Failure to extend the anti-tip device could cause personal injury or damage if the rack tips
over.
Attach the rails 11