
HP StorageWorks Sun Solaris Kit V3.0B for Enterprise Virtual Array Installation and Configuration Guide (AA-RUH4B-TE, October 2003)


Testing Connections to the Enterprise Virtual Array
30 Sun Solaris Kit V3.0B for Enterprise Virtual Array Installation and Configuration Guide
Verifying Virtual Disks from the Host
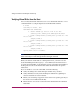
You can verify that the Sun Solaris host can access virtual disks with the format
command. Below is a sample output based on the HSV110 controller:
# format
Searching for disks...done
AVAILABLE DISK SELECTIONS:
0. c0t0d0 <SUN18G cyl 7506 alt 2 hd 19 sec 248>
/ssm@0,0/pci@1c,700000/pci@1/SUNW,isptwo@4/sd@0,0
1. c3t0d0 <COMPAQ-HSV110(C)COMPAQ-3010 cyl 2558 alt 2 hd
128 sec 128>
/swsp@0,1/sd@0,0
2. c3t0d1 <COMPAQ-HSV110(C)COMPAQ-3010 cyl 2558 alt 2 hd
128 sec 128>
/swsp@0,1/sd@0,1
3. c3t0d2 <COMPAQ-HSV110(C)COMPAQ-3010 cyl 2558 alt 2 hd
128 sec 128>
/swsp@0,1/sd@0,2
Specify disk (enter its number):
Note: Because the virtual geometry of the presented volume varies with size, always
select “autoconfigure” as the disk type for the format type command.
When you add new virtual disks to a running Solaris host, you need to use the
Secure Path Management Tool (spmgr add command) for the Solaris host to
recognize the virtual disks. Secure Path lets you map new LUNs (virtual disks) to
mount points. See the Secure Path for Sun Solaris documentation for specific
instructions.
If you are unable to access the virtual disk, check the following:
■ Verify all cabling to the switch, Enterprise Virtual Array, and host.
■ Verify all firmware levels (check the Enterprise Virtual Array QuickSpecs
and associated release notes for details).
■ Ensure you are running a supported version of the host operating system (see
the release notes included with this kit).
■ Ensure that the correct host is selected for this virtual disk in the Command
View EVA.