
HP StorageWorks IBM AIX Kit V3.0B for Enterprise Virtual Array Installation and Configuration Guide (AA-RUHAB-TE, October 2003)


Additional Host Considerations
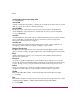
41IBM AIX Kit V3.0B for Enterprise Virtual Array Installation and Configuration Guide
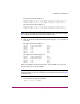
The output from brutus displays as:
hdisk3 Available 37-08-00-4,0 HP HSV110 Enterprise Virtual Array CCL
hdisk5 Available 37-08-00-4,1 HP HSV110 Enterprise Virtual Array
hdisk6 Available 3A-08-00-4,0 HP HSV110 Enterprise Virtual Array CCL
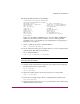
The output from miranda displays as:
hdisk3 Available 17-08-00-4,0 HP HSV110 Enterprise Virtual Array CCL
hdisk4 Available 17-08-00-4,1 HP HSV110 Enterprise Virtual Array
hdisk5 Available 1A-08-00-4,0 HP HSV110 Enterprise Virtual Array CCL
Note: This step uses hdisk5 from node
brutus
and hdisk4 from node
miranda
. These
are actually the same disks being presented to different nodes.
2. Find out the Physical Volume Identifier (PVID) using the lspv command on
each node.
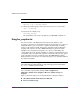
The output from brutus displays as:
hdisk0 0002997fb3fcfab5 None
hdisk1 0002997f32d9425d rootvg
hdisk2 none None
hdisk3 none None
hdisk4 none None
hdisk5 none None
hdisk6 none None
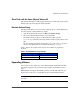
The output from miranda displays as:
hdisk0 0000981f0ebaf585 None
hdisk1 0000981f6f1f38bb None
hdisk2 0000981f6c12e583 rootvg
hdisk3 none None
hdisk4 none None
hdisk5 none None
There is no PVID for the disk on either node. Assign a PVID on one node and
have the other node use the same PVID.
Note: Select one node for the configuration, and then use the other node to import the
needed information. In this case, node
brutus
was used as the main node and
miranda
as the other node.
3. On node brutus, execute the command:
chdev -a pv=yes -l hdisk5