
HP StorageWorks HP-UX Kit V3.0B for Enterprise Virtual Array Installation and Configuration Guide (AA-RUHKB-TE, October 2003)


Testing Connections to the Enterprise Virtual Array
31HP-UX Kit V3.0B for Enterprise Virtual Array Installation and Configuration Guide
View the ioscan and insf man pages for more information on using these
commands.
If you are unable to access the virtual disk, check the following:
■ Verify all cabling to the switch, Enterprise Virtual Array, and host.
■ Verify all firmware levels (check the Enterprise Virtual Array QuickSpecs and
associated release notes for details).
■ Ensure you are running a supported version of the host operating system (see
the release notes included with this kit).
■ Ensure HP-UX is selected as the operating system for the virtual disk in
Command View EVA.
Configuring Virtual Disks from the Host
After you have set up the virtual disks on the Enterprise Virtual Array and have
rescanned or restarted the host, you need to follow the host-specific conventions
for configuring these new disk resources. These disk resources then become
usable just like any other disk resource to the host system. Refer to the
documentation that came with your server for specific instructions on setting up
disk resources.
HP-UX treats an HSV110 virtual disk much like a SCSI disk; therefore, to prepare
your virtual disk for access by the HP-UX file system, you must do the following:
■ Create the physical volume on the virtual disk using pvcreate.
■ Create the directory on the virtual disk using mkdir.
■ Create the node on the virtual disk using mknod.
■ Create the volume group on the virtual disk using vgcreate.
■ Create the logical volume on the virtual disk using lvcreate.
■ Create a file system on the virtual disk.
■ Mount the file system (to gain access to the virtual disk).
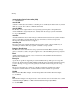
/dev/dsk/c32t0d
4
/dev/rdsk/c32t0d4
dis
k
31
255/0.0.5
sdi
sk
CLAIMED DEV
ICE
HSV110(C)COMPAQ
LUN
0x6005008B4000145020000B00000210000