HP StorageWorks Hardware Providers VDS/VSS Installation Guide This document explains how to install and use the HP StorageWorks EVA and P9000 hardware providers for Microsoft Virtual Disk Service (VDS) and Volume Shadow Copy Service (VSS). Topics include configuration components, storage system requirements, and troubleshooting.
Legal and notice information © Copyright 2008, 2010 Hewlett-Packard Development Company, L.P. Confidential computer software. Valid license from HP required for possession, use or copying. Consistent with FAR 12.211 and 12.212, Commercial Computer Software, Computer Software Documentation, and Technical Data for Commercial Items are licensed to the U.S. Government under vendor's standard commercial license. The information contained herein is subject to change without notice.
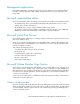
Contents 1 Overview of HP StorageWorks hardware providers ................................. 6 Windows Disk Management ........................................................................................................ Management applications ........................................................................................................... Microsoft command-line utilities ....................................................................................................
Disabling auto discovery .............................................................................................. Setting command device authentication credentials .......................................................... Setting VDS options ..................................................................................................... Setting VSS options ......................................................................................................
Figures 1 HP hardware provider software relationships ................................................................ 6 2 HP EVA hardware provider configuration ................................................................... 10 3 VDS configuration utility window (Windows Server 2003/2008) .................................. 16 4 VDS configuration utility window (Windows Server 2008 R2) ....................................... 16 5 VSS configuration utility window .........................................
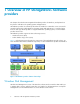
1 Overview of HP StorageWorks hardware providers This chapter describes the HP StorageWorks hardware providers for Windows, and explains how they function with Microsoft operating systems and applications. HP hardware providers are software products that are installed on a Windows server connected to an HP disk array. They enable Windows operating systems and applications to control disk array functions and copy disk array data.
Management applications Management applications operate through the Microsoft VDS and VSS services and HP hardware providers to manage application data, manage array disks and volumes, perform backups, and restore data. Microsoft command-line utilities Microsoft command-line utilities can manage any storage device with a VDS or VSS hardware provider. • The DiskPart utility, which comes standard with Windows XP and Windows Server, is used to manage disks, volumes, and partitions.
HP VDS and VSS hardware providers The HP VDS and VSS hardware providers consist of DLLs and executables that are installed on your Windows server. These components extend the capabilities of Windows and its applications to manage HP disk arrays. You can install the HP VDS or VSS hardware provider, or both. Using Windows applications and the HP VDS hardware provider, you can manage array ports; discover and manage LUNs; format, partition, and mount volumes; and create and manage file systems and files.
2 Installing HP hardware providers for HP EVA disk arrays This chapter explains how to install and uninstall HP hardware providers for the HP EVA disk arrays. Preparing to install HP EVA hardware providers This section describes required hardware and software and explains how to configure the disk array and Windows servers for use with HP hardware providers. You must complete the procedures in this section before you install the hardware providers.
Figure 2 HP EVA hardware provider configuration . Hardware • HP StorageWorks EVA Disk Array—Disk array to be managed using VDS/VSS. For supported EVA models, see the HP StorageWorks EVA hardware provider release notes. • HP StorageWorks Command View EVA Server—A Windows server running Command View EVA. Multiple EVA disk arrays must be managed from one Command View management server. Other software is conditionally required on the Command View EVA server.
• Ethernet network interface cards (or available network interface port)—Connect each server to the Ethernet LAN. Notes on installing HP EVA hardware providers The following notes will help ensure successful operation of the hardware providers: • Using multiple servers to manage primary data and data copies is optional. However, if you use multiple servers, they must be in the same Ethernet domain so that the DCOM communication process can communicate between servers.
5. Connect the server to the disk array via the built-in Fibre Channel fabric switch, if present, or an external switch. Configure the switch, including zoning if required, according to the manufacturer's instructions. For helpful information on SAN construction, see the HP StorageWorks SAN Design Reference Guide, available at www.hp.com/go/SDGManuals. 6. Connect the server to the corporate Ethernet LAN, through a firewall if desired.
4. Log in to Command View EVA using one of the user accounts you just created. 5. Add VDS and VSS hosts. For details about adding hosts, see the Command View EVA online help. 6. Add VDS and VSS disk groups. For details about adding disk groups, see the Command View EVA online help. Installing hardware providers for HP EVA disk arrays This section explains how to install and configure the HP EVA hardware providers.
2. Download and extract the HP EVA hardware providers files from the HP VDS/VSS web page: http://www.hp.com/support/HWPEVA The installer executables are provided in a self-extracting file with the name HP_StorageWorks_VDS_VSS_Hardware_Provider_for_EVA_version.exe. This file contains the executable files hpevavdsprv_xxx.exe and hpevavssprv_xxx.exe. NOTE: • There is only one self extracting file for Windows Server 2008 and Windows Server 2008 R2 because the installer executables (hpevavdsprv_xxx.
7. To accept the default destination and continue, click Next. To change the installation directory or folder, enter or browse to the new location, and then click Next. The Ready to Install the Program window opens. 8. Click Install to perform the installation. 9. During the installation, the VDS or VSS configuration utility window opens. You can configure VDS and VSS, or complete the installation and then configure VDS and VSS.
Figure 3 VDS configuration utility window (Windows Server 2003/2008) . Figure 4 VDS configuration utility window (Windows Server 2008 R2) .
1. Start the utility by selecting Start > Programs > Hewlett-Packard > Hardware Providers > VDS Configuration Utility for EVA. The utility can also be executed from a command window by running hpevavdscfg.exe, located in Program Files\Hewlett-Packard\HardwareProviders\EVA\VDS. 2. In the utility window, enter the IP address or name of the Command View EVA server in the EVA Command View Server name or IP address box, and then click Logon to log on to the server using your user name and password.
Figure 5 VSS configuration utility window . To select a snap type: 1. In the utility window, enter the IP address or name of the Command View EVA server in the EVA Command View Server name or IP address box and then click Logon to log on to the server with your user name and password. 2. Select a storage system from the EVA Storage System list.
3. Select a snap type under Snap type. • Demand Allocated Snapshot—Space for the copy is created only as needed when data is copied to the copy volume. • Fully Allocated Snapshot—Space for the copy is reserved in advance and filled when data is copied to the snapshot. • Snapclone—A complete cloned copy of the original data is created. If the snapclone properties have not been configured for the selected disk group, the Settings window opens automatically.
Figure 6 Snapclone tab settings window . Configuring a mirrorclone-snapshot The Mirrorclone-Snapshot tab in the Settings window enables you to select a disk group and modify the mirrorclone-snapshot properties.
Figure 7 Mirrorclone-Snapshot tab settings window . Configuring mirrorclones The Mirrorclone tab in the Settings window enables you to select a disk group and modify the mirrorclone properties.
Figure 8 Mirrorclone tab setting window . Removing the HP EVA hardware providers Before removing the VDS or VSS provider, issue a net stop vds or net stop vss command from the command prompt on the VDS/VSS server. Removing HP EVA hardware providers using Windows Control Panel To remove the hardware providers: 1. In Windows, select Start > Settings > Control Panel. 2. Double-click Add or Remove Programs. 3. Select the program you want to remove (VDS or VSS). 4. Click Change/Remove.
2. Enter the name of the executable for the hardware provider you want to remove (hpevavssprv_x86.exe for VSS and hpevavdsprv_x86.exe for VDS). 3. Select Remove from the window that opens, and then press Enter.
Installing HP hardware providers for HP EVA disk arrays
3 Installing HP hardware providers for HP P9000 disk arrays This chapter explains how to install and uninstall hardware providers for P9000 disk arrays. IMPORTANT: A successful installation depends on using compatible versions of the operating system and all installed software. See the hardware provider release notes for version requirements.
Figure 9 HP P9000 hardware provider configuration . • HP StorageWorks Disk Array with Business Copy and Snapshot license installed by HP. For supported XP and P9000 models, see the HP StorageWorks P9000 Hardware Providers Release Notes. • Windows VDS/VSS Server running a supported Windows Server operating system. This server manages the primary data and contains applications (such as Exchange or SQL), VDS/VSS, HP hardware providers, and XP RAID Manager Library software.
Notes on installing HP P9000 hardware providers The following can affect the performance of the HP hardware providers: • Server load • Volume size (larger PVOLs take longer to copy) • VSS hardware provider mode (Resync mode copies faster than VSS mode) The following notes will help ensure successful operation of the hardware providers: • A host group named SVOL or _SVOL containing secondary (SVOL) LUNs must be defined for use with VSS. This host group should not have any host paths to it.
vshadow -p M: N: O: HP P9000 hardware provider preparation procedures Prepare servers and software for use with the hardware providers as described below and in the product manuals. Your HP representative may perform some configuration tasks. Preparing the VDS/VSS servers The VDS/VSS server contains the applications that create and store primary data. Install and configure the server as follows: 1.
6. OPEN-9) and the same size in GB. You must create at least an equal number of primary and secondary LUNs so that there are enough secondary LUNs to hold the primary LUN copies. Some applications require twice as many or more secondary LUNs as primary LUNs. Windows limits LUNs to the range of 00 to 0xFE; do not to use a LUN number above 0xFE.
Settings depend on how the array is connected to the servers. See the following table for the meanings of selections.
1. Access the RAID Manager Library installation CD on the host. 2. Open the Windows folder, click the RMLIB folder, and then double-click the setup.exe file to start the RM installation executable. The InstallShield Welcome window opens. 3. Click Next. The Choose Destination Location window opens. 4. Click Next to select the default Destination Folder shown, or click Browse and select a different location for installing the software, and then click Next.
Installing the HP hardware providers on Windows Server 2003/2008 This section explains how to install and uninstall HP hardware providers for the HP P9000 disk arrays. IMPORTANT: A successful installation depends on using compatible versions of the operating system and all installed software. See the hardware provider release notes for version requirements. 1. Download and extract the HP P9000 hardware provider files from the HP website (http:// www.hp.com/support/HWPXP). 2.
5. The Customer Information window opens. Enter your name and your company's name. 6. Click Next. A window opens to remind you that RAID Manager Library must be installed. If you have not installed RAID Manager Library, click Cancel and install RAID Manager Library. Then return to Step 2 above and perform the provider installation again. 7. Click Next. The Destination Folder window opens. 8.
From the Windows Server GUI, select Start > Programs > Hewlett-Packard > Hardware Providers menu, and select the configuration utility executable file. NOTE: For Windows Server Core, you can start the configuration utility from the Windows GUI or from a command prompt: • Windows GUI: You will find the VDS and VSS configuration utilities in the Windows Start > Programs > Hewlett-Packard menu. • Command Window: Run the VSS (hpxpvsscfg.exe) and VDS (hpxpvdscfg.
If Enable auto discovery is selected, the arrays automatically show up in the Managed storage arrays pane and the associated command devices will show up in the Managed command devices pane of the Command devices window, if there are no authentication enabled command devices. If the arrays in the Available Storage Arrays pane have only authentication disabled command devices presented to the host, they will be moved to the Managed Storage Arrays pane.
1. 2. 3. 36 To configure arrays, use the right arrow (>) to move the disk arrays you want to manage to the right (Managed storage arrays) pane. You can also use the left arrow (<) to move the arrays from right to left. Double-click an array in the Managed storage arrays pane. A window opens in which you can configure command devices for that array. The left pane lists available RAID Manager command devices.
For more information on setting command device authentication credentials, see Setting command device authentication credentials. • After successfully setting the command device credentials, the selected command device moves to the Managed command devices pane. 4. Click OK to close the Command devices window.
Repeat this process until all devices you want to manage have been moved. Icon Description Indicates that authentication is enabled for the command device. NOTE: If the red lock ( ) icon is not present, it indicates that authentication is not enabled for the command device. 5. Click Apply to confirm changes. Setting command device authentication credentials On the Command Device Credential Setting window, do the following: 1. 2. 3.
The Set Credentials option will enable you to set or reset credentials for all the arrays with at least one authentication enabled command device.
Setting VDS options 1. In the VDS configuration utility window, click the VDS Hardware Provider Options tab to see the VDS options. 2. To specify a LUN tolerance, select the Enable LUN tolerance level check box and enter a percentage of tolerance. If you leave this function disabled, the VDS provider creates OPEN standard volume sizes if there is no close match to a requested volume size already available.
3. Under User Configurable SVOL, select a port number and a host group name. If any of the ports that belong to the selected managed array contains SVOL host group, the port is added. If you select the port number, hardware providers will use the first port number which contains the SVOL host group during shadow copy operations.
4. Select a snap type. • Business Copy 1. Select the VSS modes you want to enable as explained below. Repeat for each array to be managed. • Select VSS compliant mode if you want the provider to delete the paired relationship between PVOL and SVOL after the shadow copy is made. • Select Resync mode if you want the provider to retain the paired relationship after making a shadow copy to resynchronize the data on the PVOL and SVOL pairs when the next shadow copy is made.
• Default — If PVOL is normal, hardware providers will search for matching TP-VOLs associated with any pool ID. If PVOL is the TP-VOL, hardware providers will search for a matching TP-VOL associated with any pool other than PVOL’s associated pool. If there is no matching TP-VOL associated with other pools, hardware providers will check for a matching TP-VOL associated with PVOL’s pool. • Specify PoolID — Lists the available THP pools.
• Snapshot Snapshot enables you to create multiple real-time online local copies of logical volumes. By default, the Resync mode is selected. NOTE: The VSS Compliant mode is not applicable for snapshot. 1. Enter the MU# range. The default MU# range is 3–63, but you can specify a range from 0–63. NOTE: If you have selected the MU# range as 0–2 for snapshot creation, the same MU# range cannot be used for business copy. 2. Select a pool option.
Upgrading the HP P9000 hardware providers NOTE: If command device authentication is enabled for arrays but the required credentials are not set, the Command Device Credential Setting window is launched during upgrade. To upgrade HP P9000 hardware providers to the latest version: 1. Download and extract the HP P9000 hardware provider files from the HP website (http:// www.hp.com/support/HWPXP). 2. In the Windows Server GUI, double-click the executable file: hpxpvdsprv_xxx.exe or hpxpvssprv_xxx.
net stop vss net stop hpxpvssprv Removing the HP hardware providers using Windows 1. In Windows, select Start > Settings > Control Panel. 2. Double-click Add/Remove Programs. 3. Select the program you want to remove (HP VDS or VSS hardware provider). 4. Click Remove. Windows removes the program. Removing the HP hardware provider using the P9000 hardware provider installer You can also uninstall HP hardware provider by starting the HP hardware provider installer. Click Remove to start removal.
4 Troubleshooting the HP hardware providers This chapter explains how to troubleshoot the HP hardware providers and provides a list of VDS and VSS error messages and explanations.
1. Do the array volumes appear in the Disk Management tool? To check, in the Windows menu bar select Start > Control Panel. Select Administrative Tools. Under Computer Management, select Disk Management (under Storage). If array LUNs are not visible, click Action > Refresh and Action > Scan Disks. 2. Do the array volumes appear when you use the DiskPart utility? At the Run command prompt, enter diskpart.exe. Enter list disk to see a list of disk devices present. (Enter help to see a list of commands.
4. Make sure you configured the VSS configuration utility as explained in the configuration and installation sections. 5. Check configuration as explained in the configuration and installation sections: 6. 7. • VDS/VSS server not connected to the SAN correctly. • For P9000 and XP family of disk arrays only: Check that a host group named SVOL exists with secondary LDEVs that match the parameters of the primary LUNs (same emulation type and size). Also check that a host group named SHADOW exists.
• Privileges are not set correctly. Administrator privileges are required in all applications and on all hardware used with the HP VSS hardware provider. • A writer application is not configured according to best practices. Consult the software manufacturer for recommended practices. For example, keeping database files small by creating more rather than larger files may speed up overall operation and database copying.
Message ID Message ID value (hex) Message text VDS_E_INITIALIZED_FAILED 0x80042401L The service failed to initialize. VDS_E_INITIALIZE_NOT_CALLED 0x80042402L The initialization method is not called. VDS_E_ALREADY_REGISTERED 0x80042403L The provider is already registered. VDS_E_ANOTHER_CALL_IN_PROGRESS 0x80042404L A concurrent second call is made on an object before the first is completed. VDS_E_OBJECT_NOT_FOUND 0x80042405L The object is not found.
Message ID Message ID value (hex) Message text VDS_E_UNRECOVERABLE_ERROR 0x80042419L Unrecoverable error happened. The service must shut down. VDS_S_DISK_PARTIALLY_CLEANED 0x0004241AL The disk is not fully cleaned due to I/O error. VDS_E_DMADMIN_SERVICE_ CONNECTION_FAILED 0x8004241BL The provider failed to connect to the Logical Disk Management Administrative service. VDS_E_PROVIDER_INITIALIZATION_ FAILED 0x8004241CL The provider failed to initialize.
Message ID Message ID value (hex) Message text VDS_E_CLUSTER_COUNT_BEYOND_32BITS 0x80042430L The number of clusters is too big for 32 bit integer. VDS_E_OBJECT_STATUS_ 0x80042431L The object is in failed status. VDS_E_VOLUME_INCOMPLETE 0x80042432L All extents for the volume could not be found. VDS_E_EXTENT_SIZE_LESS_THAN_MIN 0x80042433L The size of the extent is less than the minimum. VDS_S_UPDATE_BOOTFILE_FAILED 0x00042434L Failed to update the boot.ini file or NVRAM.
Message ID Message ID value (hex) Message text VDS_E_REQUIRES_CONTIGUOUS_DISK_SPACE 0x80042440L Operation failed. The volume consists of multiple extents. VDS_E_BAD_PROVIDER_DATA 0x80042441L A provider returned bad data. VDS_E_PROVIDER_FAILURE 0x80042442L A provider failed to complete an operation. VDS_S_VOLUME_COMPRESS_FAILED 0x00042443L Failed to compress the volume. VDS_E_PACK_OFFLINE 0x80042444L The operation failed. The pack is not online.
Message ID Message ID value (hex) Message text VDS_E_NO_DRIVELETTER_FLAG 0x80042457L The provider does not support the NO DRIVELETTER volume flag. VDS_E_REVERT_ON_CLOSE 0x80042458L REVERT ON CLOSE should only be set if the HIDDEN or READ ONLY volume flag is set. VDS_E_REVERT_ON_CLOSE_SET 0x80042459L A REVERT ON CLOSE volume flag is already set for this volume.
VSS error messages Error Meaning Corrective Action VSS_E_BAD_STATE 0x80042301L A function call was invalid because of the state of the backup extensions or the coordinator. For example, calling AddToSnapshotSet before calling StartSnapshotSet. VSS_E_PROVIDER_ALREADY_REGISTERED 0x80042303L Calling RegisterProvider. VSS_E_PROVIDER_NOT_REGISTERED 0x80042304L Calling UnregisterProvider. VSS_E_PROVIDER_VETO 0x80042306L Calling DoSnapshotSet.
Error Meaning Corrective Action VSS_E_MAXIMUM_NUMBER_ OF_SNAPSHOTS_REACHED 0x80042317L AddToSnapshotSet was called on a volume that has already reached its maximum number. VSS_E_WRITER_INFRASTRUCTURE 0x80042318L The Writer infrastructure is not operating properly. Check that the Event Service and the Volume Snapshot Service are started and check for errors associated with these services in the error log. VSS_E_WRITER_NOT_RESPONDING 0x80042319L A writer did not respond to a GetWriterStatus call.
Troubleshooting the HP hardware providers (EVA only) Command View EVA authentication failure Smart Start v7.2 may cause login failures for applications such as the HP EVA hardware providers using the Command View EVA API. This issue occurs when a server is built using the new SS v7.2 CD and then Command View EVA software is installed. To resolve this issue, reset the HP Command View EVA API password. This password enables any application that uses the HP Command View EVA API to authenticate properly.
Message Id Severity Module Description 1501 Error hpxpvssprv Failed to move shadow copy volume AAA to host group BBB on XP and P9000 disk array with serial number CCC. HP P9000 Hardware Provider will not be able to proceed in the shadow copy creation process. For additional details please see log file: hpxpvssprv.log. 1502 Error hpxpvssprv Failed to wait for shadow copy PAIR status for source volume AAA and shadow copy volume BBB on XP and P9000 disk array with serial number CCC.
Message Id Severity Module Description 1554 Error hpxpvdsprv Failed to delete volume AAA of size BBB and type CCC in disk array DDD (status: EEE). For additional details, please see log file: hpxpvdsprv.log. 1555 Error hpxpvdsprv Failed to delete volume AAA of size BBB and type CCC in disk array DDD(status: EEE). For additional details, please see log file: hpxpvdsprv.log. 1556 Error hpxpvdsprv Failed to unmask (map) the volume AAA in disk array BBB to the WWN CCC(status: DDD).
Message Id Severity Module Description 1153 Informational hpxpvdsprv Successfully unmasked (mapped) the volume AAA in disk array BBB to the WWN CCC. 1153 Informational hpxpvdsprv Successfully unmasked (mapped) the volume AAA in disk array BBB to the WWN CCC. 2400 Error hpxpvdsprv This is a sample error message for the VSS layer, first argument: AAA, second argument: BBB, third argument: CCC. 2401 Error hpxpvdsprv Failed to load the HP P9000 Hardware Provider.
Message Id Severity Module Description 2411 Error hpxpvdsprv Failed to commit shadow copies for snapshot set with ID AAA. For additional details, please see log file: hpxpvdsprv.log. 2412 Error hpxpvdsprv Post-commit shadow copy operation failed for snapshot set with ID AAA. For additional details, please see log file hpxpvdsprv.log. 2001 Informational hpxpvssprv Successfully imported shadow copy volume with WWID AAA to the local host.
Message Id Severity Module Description 3002 Informational hpxpvdsprv The HP P9000 VDS hardware provider has registered successfully. 3003 Informational hpxpvdsprv The HP P9000 VDS hardware provider has unregistered successfully. 3004 Informational hpxpvdsprv The HP P9000 VDS hardware provider has loaded successfully. 1401 Error hpxpvssprv / hpxpvdsprv Failed to perform the requested operation due to non-availability of the required array resources.
Message Id Severity Module Description 1510 Error hpxpvssprv Specified Pool with Id AAA has reached threshold on the P9000 disk array with serial number: BBB. HP P9000 Hardware Providers will not be able to proceed in the shadow copy creation process. For additional details, please see log file: hpxpvssprv.log 1512 Error hpxpvssprv Source volume AAA has invalid pair status BBB on the P9000 disk array with serial number: CCC.
5 Support and other resources Related documentation The following documents provide related information: • HP StorageWorks EVA VDS and VSS Hardware Providers 4.05.00 for Windows Server 2003 Release Notes • HP StorageWorks EVA VDS and VSS Hardware Providers 6.05.00 for Windows Server 2008 and Windows Server 2008 R2 Release Notes • HP StorageWorks P9000 VDS and VSS Hardware Providers 5.02.
http://www.hp.com/go/e-updates After registering, you will receive email notification of product enhancements, new driver versions, firmware updates, and other product resources. HP websites For additional information, see the following HP websites: • • • • • http://www.hp.com http://www.hp.com/go/storage http://www.hp.com/service_locator http://www.hp.com/support/manuals http://www.hp.com/support/downloads Documentation feedback HP welcomes your feedback.
Glossary This glossary defines acronyms and terms used in this guide or related to this product and is not a comprehensive glossary of computer terms. API Application Programming Interface, an interface that allows a software application to connect to and work with another software application. clone A full copy of a volume, usable by an application. Command View EVA HP StorageWorks Command View, a browser-based interface that allows management of an HP disk array.
provides automatically-switched connectivity between servers and storage in the fabric. shadow copy A Microsoft term describing a point-in-time copy of an original volume. The original volume continues to change as the process continues, but the shadow copy of the volume remains constant. snapclone An HP EVA disk array term denoting a full copy of a volume that becomes immediately usable by an application.
Index D A additional servers configuring, 12 applications, 7 VDS, 8 VSS, 8 array configuration, 11, 28 configuration — EVA, 9 B block diagram, 6 C command devices—P9000 hardware providers, 34 Command View configuration for HP EVA hardware providers, 11 Command View management server, 10 command-line utilities, 7 components, 6 hardware, 10, 26 hardware providers, 6 required—EVA, 9 required—P9000, 25 configuration EVA, array, 9 additional servers, 12 array and server, 11, 28 diagram—P9000, 25 important not
HP EVA hardware providers server configuring, 11 HP P9000 hardware provider server configuring, 28 HP P9000 hardware providers uninstalling, 45 I important HP P9000 notes, 27 installation HP EVA hardware providers, 13 HP P9000 hardware provider, 25 summary P9000 hardware providers, 30 installation-P9000 VDS options, 40 M manage arrays—P9000 hardware providers, 34 manage command devices—P9000 hardware providers, 34 management applications, 7 mirrorclone-snapshots configuring, 20 mirrorclones configuring, 2