HP ENVY 23 IPS Monitor User Guide
© 2013, Hewlett-Packard Development Company, L.P. Microsoft, Windows, and Windows Vista are either trademarks or registered trademarks of Microsoft Corporation in the United States and/or other countries. The only warranties for HP products and services are set forth in the express warranty statements accompanying such products and services. Nothing herein should be construed as constituting an additional warranty. HP shall not be liable for technical or editorial errors or omissions contained herein.
About This Guide This guide provides information on monitor features, setting up the monitor, using the software and technical specifications. WARNING! Text set off in this manner indicates that failure to follow directions could result in bodily harm or loss of life. CAUTION: Text set off in this manner indicates that failure to follow directions could result in damage to equipment or loss of information. NOTE: Text set off in this manner provides important supplemental information.
iv About This Guide
Table of contents 1 Product Features ............................................................................................................................................ 1 2 Setting Up the Monitor ................................................................................................................................... 2 Attaching the Monitor Base .................................................................................................................. 2 Rear and Side Components ...
vi
1 Product Features The light-emitting diode (LED) backlit monitor has an active matrix, In-Plane Switching (IPS) panel. The monitor features include: ● 58.
2 Setting Up the Monitor To set up the monitor, ensure that the power is turned off to the monitor, computer system, and other attached devices, then follow the instructions below. Attaching the Monitor Base CAUTION: The screen is fragile. Avoid touching or applying pressure to the screen; doing so can cause damage. TIP: Consider the placement of the display, because the bezel might cause interfering reflections from surrounding light and bright surfaces. 2 1.
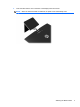
3. Insert the stand into the slot on the back of the display head until it clicks. NOTE: When the base and stand are attached, the plastic hook automatically locks.
Rear and Side Components 4 Component Function 1 HDMI 1 Connects the HDMI cable from the source device to the monitor. 2 HDMI 2 Connects the HDMI cable from the source device to the monitor. 3 VGA Connects the VGA cable from the source device to the monitor. 4 Audio Connects speakers to the monitor. 5 DC Power LED Illuminates when power adapter is connected to the monitor. 6 DC Power Connector Connects the DC power adapter to the monitor.
Connecting the Cables 1. Place the monitor in a convenient, well-ventilated location near the computer. 2. Connect a cable. NOTE: The monitor is capable of supporting analog or HDMI input. The video mode is determined by the video cable used. The monitor will automatically determine which inputs have valid video signals. The inputs can be selected by pressing the Input Control/Plus button on the front panel or through the OnScreen Display (OSD) feature by pressing the Menu button.
6 ● An HDMI cable is provided. Connect the provided HDMI cable to an HDMI connector on the back of the monitor and the other end to the source device. ● Connect a micro USB-to-HDMI cable (purchased separately) to an HDMI connector on the rear of the monitor and to the micro USB connector on a source device, such as a smart phone, to view content from the mobile device on your monitor screen.
3. Connect the round end of the power supply cord to the monitor, and then connect one end of the power cord to the power supply and the other end to a grounded electrical outlet. WARNING! To reduce the risk of electric shock or damage to the equipment: Do not disable the power cord grounding plug. The grounding plug is an important safety feature. Plug the power cord into a grounded (earthed) electrical outlet that is easily accessible at all times.
Front Panel Controls Table 2-1 Monitor Front Panel Controls Control Function 1 Menu Opens, selects or exits the OSD menu. 2 Audio/Minus Opens the Audio menu to adjust the volume. If the OSD menu is on, press to navigate backward through the OSD menu and decrease adjustment levels. 3 Input Control/Plus If the OSD menu is inactive, press to activate the input control button that chooses the video signal input (VGA or HDMI).
Turning on the Monitor 1. Press the power button on the front of the monitor to turn it on. 2. Press the power button on the computer to turn it on. CAUTION: Burn-in image damage may occur on monitors that display the same static image on screen for a prolonged period of time.* To avoid burn-in image damage on the monitor screen, you should always activate a screen saver application or turn off the monitor when it is not in use for a prolonged period of time.
variety of advanced image quality applications. This panel technology, however, is not suitable for applications that exhibit static, stationary or fixed images for long periods of time without the use of screen savers. These types of applications may include camera surveillance, video games, marketing logos, and templates that are displayed on the screen for a prolonged period of time. Static images may cause image retention damage that could look like stains or watermarks on the monitor's screen.
Installing a Cable Lock You can secure the monitor to a fixed object with an optional cable lock available from HP.
3 Using My Display Software The disc provided with the monitor includes My Display software. Use My Display software to choose preferences for optimum viewing. You can select settings for gaming, movies, photo editing or just working on documents and spreadsheets. My Display also provides an easy way to adjust settings such as brightness, color, and contrast. Installing the Software To install the software: 1. Insert the disc in your computer disc drive. The disc menu is displayed. 2.
Downloading the Software If you prefer to download the My Display software, follow the instructions below. 1. Go to the HP Technical Support website at http://www.hp.com/support and select your country/ region. 2. Select Drivers & Software, type your monitor model in the Search field, and click Search. 3. If necessary, select your monitor from the list. 4. Select your operating system, and then click Next. 5. Click Utility - Tools to open the list of utilities and tools. 6. Click HP My Display.
4 Finding More Information Reference Guides Refer to the HP LCD Monitors Reference Guide included on the disc with your monitor for additional information on: ● Optimizing monitor performance ● Safety and maintenance guidelines ● Installing software from the disc ● Using the OSD menu ● Downloading software from the Web ● Agency regulatory information ● Troubleshooting and recommended solutions to common problems Product Support For additional information on using and adjusting your monitor,
A Technical Specifications NOTE: All specifications represent the typical specifications provided by HP's component manufacturers; actual performance may vary either higher or lower. For the latest specifications or additional specifications on this product, go to http://www.hp.com/go/ quickspecs/ and search for your specific display model to find the model-specific QuickSpecs. Table A-1 HP ENVY 23 Specifications Display 58.4 cm wide screen 23 inches wide screen Type IPS Viewable Image Size 58.
Table A-1 HP ENVY 23 Specifications (continued) Altitude: Operating 0 to 5000 m 0 to 16,400 feet Storage 0 to 12192 m 0 to 40,000 feet Measured Power Consumption: 16 Full Power 28 watts Typical Settings 26.5 watts Sleep <0.5 watts Switch Off <0.
Recognizing Preset Display Resolutions The display resolutions listed below are the most commonly used modes and are set as factory defaults. This monitor automatically recognizes these preset modes and they will appear properly sized and centered on the screen. Table A-2 Factory Preset Modes Preset Pixel Format Horz Freq (kHz) Vert Freq (Hz) 1 640 x 480 31.469 59.94 2 720 x 400 31.469 70.087 3 800 × 600 37.879 60.317 4 1024 × 768 48.363 60.004 5 1280 × 720 45 60 6 1280 × 1024 63.
Entering User Modes The video controller signal may occasionally call for a mode that is not preset if: ● You are not using a standard graphics adapter. ● You are not using a preset mode. If this occurs, you may need to readjust the parameters of the monitor screen by using the on-screen display. Your changes can be made to any or all of these modes and saved in memory. The monitor automatically stores the new setting, then recognizes the new mode just as it does a preset mode.