
HP StorageWorks Encryption SAN Switch quick start instructions (AR944-90001, March 2009)

4. Open a terminal emulator (such as HyperTerminal on a PC, or term,
tip, or Kermit in a UN IX environment), and configure the application
as follows:
For most Windows systems:
Bits per second: 9,600
Databits: 8
Parity: None
Stop bits: 1
Flow control: None
For most UNIX systems:
tip /dev/ttyb -9600
If ttyb is already in use, use ttya instead:
tip /dev/ttya -9600
Log in to the serial console port
1. Verify that the switch has completed POST. When POST is complete,
the port status and switch power and status LEDs return to normal
state.
2. When the terminal e mulator stops reporting information, press Enter
to display the login prompt.
3. Log in to the switch as admin, using the default password,
password. You are prompted to change the default password
at initial login.
Set a stat
ic IP address
1. Log in to
the switch using the default password, password.
2. Use the i
paddrset command to set the Ethernet IP address.
Etherne
t IP Address: 192.168.74.102
3. Provid
etherestofthenetworkinformation.
Ethern
et Subnetmask: 255.255.255.0
Ethern
et IP Address: 192.168.74.102
Ethern
et Subnetmask: 255.255.255.0
4. Option
ally, verify the IP address by entering the ipAddrShow
comman
d at the prompt.
5. Recor
d the IP address on the pull-out tab on the port side of the
switc
h.
6. If th
e serial port is no longer required, use the logout command to
log out of the serial console. Remove the serial cable and replace
the plug in the serial port.
Connect an Ethernet cable and open a Telnet
session
1. Remove the plug from the Ethernet port.
2. Connect an Ethernet cable to the switch Ethernet port a nd to the
workstation or to an Ethernet network containing the workstation.
3. Open a Telnet session on the workstation.
Set the domain ID
1. Log on to the switch by Telnet, using th e admin account.
2. Modify the domain ID if required (default is 1).
• If the switch is powered on after it is connected to the fabric,
and the default domain ID is already in use, the domain ID for
the new switch is automatically reset to a unique value.
• If the switch is connected to the fabric after it has been powered
on, and the default domain ID is already in use, the fabric
segments. To find the domain IDs that are currently in use, run
the fabricShow command on another switch in the fabric.
3. Disable the switch by entering the switchDisable command.
4. Enter the configure command. At each command prompt, enter
anewvalueorpressEnter to accept each default value.
5. Enter y at the following prompt:
Fabric param (yes, y, no, n): [no] y
6. Enter a unique domain ID (such as the domain ID for the previous
switch, if available):
Domain: (1..239) [1] 3
7. Respond to the remaining prompts or press Ctrl-D to accept the
settings without completing the prompts.
8. Re-enable the switch by entering the switchEnable command.
Set the date an d time
Thedateandtimesettingsareusedforlogging,errordetection,and
troubleshooting so you should set them correctly.
1. If necessary, log on to the switch by Telnet, using the admin account.
2. Enter the date command, using the following syntax:
date "mmddHHMMyy"
• mmisthemonth;validvaluesare01through12.
• dd is the date; valid values are 01 through 31.
• HH is the hour; valid values are 00 through 23.
• MM is minutes; valid values are 00 through 59.
• yy is the year; valid values are 00 through 99
3. Enter the tsTimeZone command:
switch:admin> tstimezone [--interactive]/
[, timezone_fmt]
Use timezone_fmt to set the time zone by country/city or by
time-zoneID,suchasMST.Thefollowingexampleshowshowto
changethetimezonetoUS/Mountain:
switch:admin> tstimezone
Time Zone : US/Pacific
switch:admin> tstimezone US/Mountain
switch:admin> tstimezone
Time Zone : US/Mountain
4. Enter the tsClockServer command to synchronize local time:
switch:admin> tsclockserver “<ntp1;ntp2>”
ntp1 is the IP address or DNS name of the first NTP server, whic h
theswitchmustbeabletoaccess. ntp2 is the second NTP server
and is optional. When multiple NTP server addresses are included,
tsclockserver sets the first obtainable address as the active
NTP server. The default value is LOCL.
switch:admin> tsclockserver
LOCL
switch:admin> tsclockserver "132.163.135.131"
switch:admin> tsclockserver
132.163.135.131
switch:admin>
Verify operation and backup configuration
1. Check the LEDs to verify that all components are functional. For
information about LED patterns, see the HP StorageWorks 8Gb
SAN Switch har
dware reference guide.
2. If necessary, log on to the switch by Telnet, using the admin account.
3. Run the portcfgpersistentenable command to activate the
Fi bre Chann el ports for Fibre Channel operation.
4. Verify correct operation of the Encryption SAN Switch by issuing
the switchShow command.
5. V erify correct operation in the fabric by issuing the fabricShow
command.
6. Back up the switch configuration to an FTP server by issuing the
configUp
load command and following the prompts.
This command uploads the switch configuration to the ser ver,
making i
tavailablefordownloadtoareplacementswitchif
necessa
ry.
Connect devices
1. If necessary, re move the plugs from the por ts to be used.
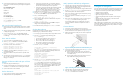
2. Ensure th at the bail (wire handle) is in the unlocked position. Place
the SFP transceiverin the correct position on the port. See Figure 2.
3. Slide the SFP transceiver into the port until it clicks into place and
then close the bail.
Figure 2 Installing SFP transceiver in Fibre C hannel ports
4. Co
nnect the Fibre Channel cables from the swi tch (Figure 3)toyour
ho
st and storage devices (not shown) .
a
.
R
emove the plastic protector caps (if any) from the Fibre
C
hannel cable ends, and position the cable connector so that
i
tisorientedcorrectly.
b. Insert the cable connector into the SFP transceiver until it is
firmly seated an d the latching mechanism clicks.
!
2644 2a
Figure 3 Inserting cable connectors into SFP transceiver
5. Check the LEDs to verify that all components are functional.
6. Verify the correct operation of the switch by entering the
switchShow command from the workstation.
Configure for enc
ryption
If you are configu
ring the Encryption SAN Switch for e ncryption services
for the first time, you must perform the following pre-initialization tasks:
• Generate the Cri tical Security Parameters (CSPs) and certificates.
• Load and set up the cer ti ficates.
• Establish a trusted link (HP SKM).
• Register the Encryption switch with HP SKM.
• Configure the global parameters and policies of the encr yption
group.
• Generate and back up the master key in SKM environments.
• Manage key-vault high availability.
• Configure cluster interconnect.
After comp
leting the pre-initialization tasks, you may need to p erform
several tasks related to configuring the encryption group. See the Fabric
OS 6.2 enc
ryption admin istrator guide for the procedures to confi gure
theswitchencryptionfunctions.