
Brocade Fabric OS Encryption Administrator's Guide v6.3.0 (53-1001341-02, July 2009)


20 Encryption Administrator’s Guide
53-1001341-02
Smart card usage
2
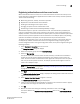
9. Repeat steps 7 through 10 until you have registered all the cards, and they all display in the
Registered Authentication Cards table on the Authentication Cards dialog box. Remember that
you need to register the number selected as the quorum size plus one.
Registering authentication cards from the database
Smart cards that are already in the Management program’s database can be registered as
authentication cards.
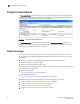
1. From the Register Authentication Cards dialog box, select Register from Archive.
The Authentication Cards dialog box displays, showing a list of smart cards in the database.
2. Select the card from the table, and click OK.
3. Wait for the confirmation dialog box indicating initialization is done, and click OK.
The card is added to the Registered Authentication Cards table.
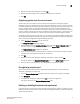
De-registering an authentication card
Authentication cards can be removed from the database and the switch by de-registering them.
Use the following procedure to de-register an authentication card.
1. Select the authentication card on the Authentication Card table.
2. Click Deregister.
3. A confirmation dialog box is displayed. Click OK to confirm de-registration.
The Encryption Group dialog box displays.
4. Click OK on the Encryption Group dialog box.
The card is de-registered from the group.
Using authentication cards
When a quorum of authentication cards are registered for use, an Authenticate dialog box is
displayed to grant access to the following:
• The Encryption Group Properties dialog box Security tab.
• The Encryption Group Properties dialog box Link Keys tab.
• The Master Key Backup dialog box.
• The Master Key Restore dialog box.
• The Edit System Card dialog box.
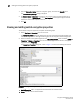
To authenticate using a quorum of authentication cards, do the following:
1. When the Authenticate dialog box is displayed, gather the number of cards needed, as
directed by instructions on the dialog box. The currently registered cards and the assigned
owners are listed in the table near the bottom of the dialog box.
2. Insert a card, and wait for the ID to appear in the Card ID field.
3. Enter the assigned password.
4. Click Authenticate.