
Brocade Fabric OS Encryption Administrator's Guide Supporting Fabric OS v6.2.0 (53-1001201-04, May 2009)


Encryption Administrator’s Guide 111
53-1001201-04
Key vault configuration
3
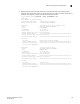
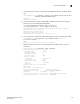
n. Enter the cryptocfg --show -groupcfg command on the member node. The display now
shows the LKM as connected.
SecurityAdmin:enc1_switch>cryptocfg --show -groupcfg
Encryption Group Name: brocade
Failback mode: Manual
Heartbeat misses: 3
Heartbeat timeout: 2
Key Vault Type: LKM
Primary Key Vault:
IP address: 10.33.54.231
Certificate ID: lkm-1
Certificate label: LKM1
State: Connected
Type: LKM
Secondary Key Vault not configured
[output truncated]
6. Generate the trusted link establishment package (TEP) on all nodes to establish a trusted link
between each node and the NetApp LKM appliance. Do not use the -file option for this step as
it will interfere with the automatic trusted link generation.
NOTE
Complete all steps required to establish a trusted link between LKM and the encryption group
members for each node before proceeding to the next node.
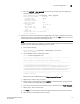
a. Issue the DH challenge.
SecurityAdmin:switch>cryptocfg --dhchallenge 10.33.54.231
Operation succeeded.
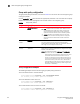
b. On the LKM MC, view the unapproved trustees.
lkm-1> trustee unapproved list
----------------------------------------------------------------------
------------------------------------------
|Trust Request ID |Trustee Name |Trust Request Verifier
|
|----------------------------------------|---------------|------------
-----------------------------------------|
|170021012de48e7f59c0af46f3d4ecee6f178715|openkey_trustee_10.32.244.71
|2f0a4bef3b8b4472554a1fa3c2304f8c3cafc21794228ea19f384a5c14a5c14d|
|17002101001ea980af5279bef17b768dbf258349|openkey_trustee_10.32.244.60
|a239dc58410fd937b0afdf5c247fe6deb0bc45b2d6e1c71f475304ac9be228b0|
-----------------------------------------------------------------------
------------------------------------------
listed: 2 object(s)
Alternately, launch the DMC and click the View Unapproved Trustees tab.
c. Right-click the node you wish to approve.
d. Provide a label in the dialog box and click Approve to approve the TEPs and generate the
trusted acceptance package (TAP) responses.
e. Insert the recovery card into the card reader, enter a password and click Verify Password.
f. Repeat step e. with the second card.
g. Click Start. You are prompted to swap cards again. Follow the instructions on the screen.
h. Save the TAP to a file (location does not matter).