
HP StorageWorks Enterprise Modular Library E-Series User Guide (AH876-96001, September 2007)

Home Screen
Status Screen
Support Screen
Identity Screen
HP Support Info
Unlock Load Ports
Unlock Door
Reboot Library
Media Operations
Run Admin Tests
Service Menu >
Health Summary >
Component Status >
Event Log Type
Selection
View Library
Inventory
Library Robotics >
- Library Status
- Robotics Status
- Power Supply Status
- Power Supply 1-6
Load Ports
- Load Ports 1-4
Drives
- Drive 1-16
Interface Controllers
- Interface Controller 1-4
Interface Manager
Change Password
Configure Load Ports
Change Network Settings
Configure Barcode
Reporting Formats >
- Format for front panel
reporting
- Format for host
reporting
Configure Reserve Slots
Configure Inventory Mode
Reset Library Robotics
Defaults
Cancel Inventory Prompt
Move Tape
Operator Control Panel
- Align Touch Screen
- Panel Colors
- Panel Pixel Test
- Panel Firmware Version
- Turn Backlight Off
- Inventory Library
Run Demo
Run Self Test
Slot Test
Drive Load/Unload Test
Force Rewind Unload Test
Recalibrate Library
Restore Library Defaults
Library and Robotics Status >
- Library Status
- Robotics Status
- Drive Odometers
Individual Drive Status
All Drive Summary
Interface Controller Status >
- Interface Controller 1-4
Interface Manager Status
Configuration
Screen
Operations Screen
Library
Configuration >
Contact
Information
Display Library
Time
Adjust Screen
Contrast
11599
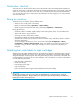
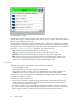
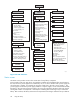
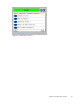
Figure 30 OCP functions
Status scr een
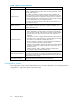
The Status screen provides access to the current state of every library component.
Powe
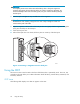
r supplies, load ports, tape drives, and interface controllers are all numbered from top to bottom in
the rack. However, power supplies are numbered by slot, so if a slot is not filled with a power supply, the
slot still receives a number. For example, the top power supply s lot in the rack is power supply 1. The
powe
r supply slot under that is power supply number 2. If a power supply is on the same level horizontally
(like those in the c ard cage expansion module), the one to the right (facing the back of the rack) has the
next highest number. If a component is removed, the numbering does not change until you reboot the
library. After a reboot, the library rediscovers all components and reassigns numb ers from top to bottom.
48
Using the library