
HP StorageWorks Enterprise Modular Library E-Series user guide (AH876-96001, October 2007)
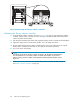


4. Label the cables or write a note that shows the locations of all the cables plugged into the inter face
controller to make it easier to reconnect them later.
5. Unplug all cables from the interface contro ller.
6. Loosen the captive screws in the black ejector h andles at both ends of the interface controller.
Use a #1 Phillips screwdriver .
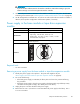
7. Push the ejector handles to the outside.
8. Pull the ejector hand les to remove the interface controller from the library.
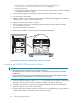
10972
Figure50Removingthee2400-FC4Gbinterfacecontroller
Replacin
g an e2400-FC 4Gb interface controller
NOTE:
You can install the interface controller in t wo locations in the library:
• Themiddleslotinthecardcageinthebasemodule.Youmustalwayshaveaninterfacecontroller
installe
dthere.
• Any of the slots in the card cage expansion module. You must have one interface controller installed
here for every four additional LTO2 or LTO3 tape drives that you install.
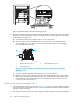
1.
Orient the interface controller as shown in Figure 50 on page 88. Align the interface controller with
the guides in the slot in the card cage and slide the interface controller into the library.
2. Push the ejector handles to the inside to fully engage the interface controller into the backplane.
3. Tightenthecaptivescrewsinbothejectorhandles.
4. Plug the cables i nto the interface controller exactly as they were plugged into the original interface
controller (see the labels on the cables or the note that you wrote) .
5. Turn on the power to the library.
6. When you install a new interface controller, you must use a different power-on procedure one time.
Reset the interface controller twice to prepare it for con figuration.
• Insert a paper clip into the Reset hole (see
“HP StorageWorks e2400- F C 4Gb interface controller” on page 58).
• Wait three minutes for the interface controller to reset.
• Reset the interface controller again and wait another three minutes.
88
Removing and replacing parts