
HP StorageWorks EML E-Series Ultrium 1840 Tape Drive Module upgrade or replacement (AH682-96003, July 2008)


6. Remove the old ta
pe drive.
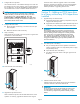
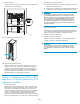
a. Identif y the tap
e drive to be replaced. The fault LED might
be lit.
10546
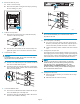
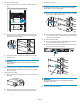
b. Disconnect the FC cable from the drive to be replaced by
pressing down on the cable connector tab and pulling the
connecto
rawayfromthedrive.
10547
c. Discon
nect the other end of the FC cable from the interface
contro
ller card.
CAUTION:
Leave the interface controller card in the library to maintain
proper airflow .
d. If necessary, use a screwdriver to loosen the captive screw at
the right side of the drive module. G rasp the drive and pull it
from the drive bay.
7. Install the new tape drive.
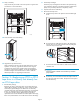
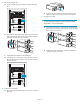
a. Remove the end cap from the port A FC conn ector on the new
tape drive.
11551
b. Insert the new drive module into the vacant drive bay and
tighten the captive screw to secure the drive to the chassis.
8. Connect the FC ca
ble.
CAUTION:
To avoid damaging FC cables, do not pinch or bend the cables
sharper than a 5 cm (2 inch) diameter.
a. Connect an FC cable to the port A FC connector on the new
drive. The FC cable clicks into place.
11552
b. Connect the other end of the FC cable to its corresponding
port on the SAN. Attach a label to each end of the cable to
mark the por t designations.
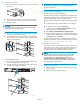
9. Connect the Ethernet cable.
a. Insert one end of the Ethernet cable included with the tape
drive to the MGMT port on the tape drive.
b. Connect the other end of the Ethernet cable to the internal
network switch installed in the library.
11559
1
2
IMPORTANT:
Do not connect the MGMT port or internal network switch to
thepublicorsiteLAN.
10. Insert new LTO4 media if desired.
Page 8