
HP StorageWorks EML E-Series Ultrium 1840 Tape Drive Module upgrade or replacement (AH682-96003, July 2008)


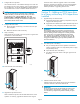
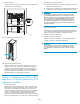


5. Install the new t
ape drive.
a. Remove the end ca
p from the port A FC connector on the new
tape drive.
11551
b. Insert the new drive module into the vacant drive bay and
tighten the captive screw to secure the drive to the chassis.
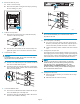
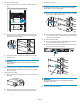
6. Connect the FC cable.
CAUTION:
To avoid damaging FC cables, do not pinch or bend the cables
sharper than a 5 cm (2 inch) diameter.
a. Connect an FC cable to the port A FC connector on the new
drive. The FC cable clicks into place.
b. Connect the other end of the FC cable to its corresponding
port on the SAN. Attach a label to each end of the cable to
mark the por t designations.
11552
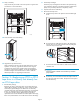
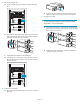
7. Connect the Ethernet cable.
a. Insert one end of the Eth ernet cable included with the tape
drivetotheMGMTportonthetapedrive.
b. Connect the other end of the Ethernet cable to the internal
network switch installed in the library.
11559
1
2
IMPORTANT:
Do not connect the MGMT port or internal network switch to
thepublicorsiteLAN.
8. Insert new LTO
4mediaifdesired.
9. Reset the Inte
rface Manager card defaults.
Reset the Interface Manager c ard defaults from Command View TL
or the Interf
ace Manager. Retain the Interface Manager Network
Settings, SN
MP Settings, and Trace and Event lo gs.
To reset the Interface Manager card defaults from Command View
TL:
a. In the Launcher window, select the library to be configured.
b. In the Library window, click the Support tab.
c. In the left panel, select Restore Factory Defaults.Alistof
components appears in the right panel.
d. Select Ac
tions > Restore Defaults on All Components.
e. On the scr
een that appears you can retain Interface Manager
Network
Settings, SNMP Settings, and Trace and Event Logs.
Click Ne
xt and then click Finish.
To reset
the Interface Manager card defaults from the Interface
Manager command line, log in and enter th e following command:
restore system defaults imnet logs snmp
10. Configure the new tape drive.
Use Com
mand View TL or the Interface Manager CLI to enter the
host mapping, access control, and FC speed settings for the new
tape d
rive. See the HP StorageWorks Interface Manager and
Command View TL User's Guide for detailed i nstructions.
NOTE:
IfyoudonotseethedriveinCommandViewTL,determine
whether the library can find the dri ve by looking at the OCP:
fromtheHomescreen,selecttheStatus tab, then select
Component Status > Individual Drive Status.IftheOCPshows
the drive information correctly, check the Ethernet cabling to the
driveandtheinternalnetworkswitch.
11 . Configure the SAN switch.
a. Rezone the SAN, if necessary, to account for the new tape
drive and paths.
b. Reboot the SAN FC switch if necessar y.
Page 6