
HP StorageWorks EML E-Series Ultrium 1840 Tape Drive Module upgrade or replacement (AH682-96003, July 2008)


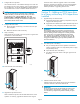
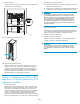


11 . Verify connecti
vity .
Verify that the F
C port A LED on the new tape drive is green when
connected to a sw
itch and linked.
11558
26
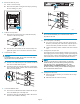
12. Close the b
ack doors of the library.
10545
13. Upgrade the tape drive firmware.
Make s
urethatthetapedrivehasthelatestfirmware for correct
opera
tion. If necessary, upgrade the drive firmware using the
Command View TL firmware upgrade wizard or the Interface
Mana
ger's Command Line Interface. See the HP StorageWorks
Interface Manager and Command View TL User's Guide for
deta
iled procedures on upgrading drive firmware.
Section 3—Replacing an LTO2 or LTO3
tape drive in a library that already has
an LTO4 tape drive
1. Record library settings.
Replacing an LTO2 or LTO3 tape drive with an LTO4 tape drive
requires all host mapping, partitioning, access control, and Fibre
Channel (FC) speed settings to be cleared out and m anually
re-entered at the end of the replacement procedure. In preparation
for this, use Command View TL or the Inter face Manager CLI
to write down all these settings before beginning the drive
replacement. Because the hardware and device paths will change,
ETLA's save/restore features can not be used to re-enter old settings.
2. Unload tape cart
ridges.
Unload any tape cartridges from the drive to be replaced using
your applicatio
n software or the library Operator Control Panel
(OCP). Use your
backup software to stop library activity.
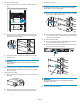
3. Open the back d
oors of the library.
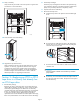
4. Remove the old
tape drive.
a. Identify the t
ape drive to be replaced. The fault LED might
be lit.
10546
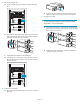
b. DisconnecttheFCcablefromthedrivetobereplacedby
pressing down on the cable connector tab and pulling the
connect
or away from the drive .
10547
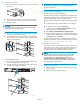
c. Disc
onnect the other en d of the FC cable from the interface
cont
roller card.
CAUTION:
Leave the interface controller card in the library to ma i ntain
proper airflow .
d. If necessary, use a screwdriver to loosen the captive screw at
the right side of the drive module. Grasp the drive and pull it
from the drive bay.
Page 5