
HP StorageWorks EML E-Series Ultrium 1840 Tape Drive Module upgrade or replacement (AH682-96003, July 2008)


Section1—AddinganLTO4tapedrive
to a library that already has an LTO4
tape drive
1. Turn off the power to the library.
a. Use your backup software or the Operator Control Panel
(OCP)toemptythepickerortoverifythatthepickerisempty.
Stop all library activity.
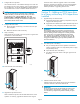
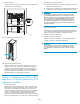
b. Open the back doors of the library.
c. Turn off the main power switch in the upper right corner of
the library.
10538
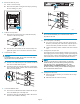
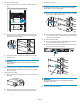
2. Remove the drive bay cover.
a. Locate a vacant drive bay.
b. Removethefaceplatecoveringthedrivebaybyremoving
the screw holding it in place.
11550
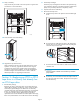
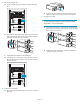
3. Install the new tape drive.
a. Remove the end cap from the port A Fibre Channel (FC)
connector on the new tape drive.
11551
b. Insert the new drive module into the vacant drive bay and
tighten the captive screw to secure the drive to the chassis.
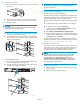
4. Connect the FC ca
ble.
CAUTION:
To avoid damaging FC cables, do not pinch or bend the cables
sharper than a 5 cm (2 inch) diameter.
a. Connect an FC cable to the port A FC connector on the new
drive. The FC cable clicks into place.
b. Connect the other end of the FC cable to its corresponding
port on the SAN. Attach a label to each end of the cable to
mark the por t designations.
11552
5. Connect the Ethernet cable.
a. Insert one end of the Ethernet cable included with the tape
drive to the MGMT port on the tape drive.
b. Connect the other end of the Ethernet cable to the internal
network switch installed in the library.
11559
1
2
IM
PORTANT:
Do not connect the MGMT port or internal network switch to
thepublicorsiteLAN.
6
.
T
urn on the power to the library.
a
.
T
urnonthemainpowerswitchintheupperrightcornerof
the library. Check all power indicators to verify that power is
restored. The library will take 20 minutes or more to boot.
b. Verify that the library robotics controller card Active ind icator
is lit.
Page 2