
HP StorageWorks EML E-Series Tape Library Internal Network Kit Installation and Replacement Instructions (AJ001-96002, May 2010)

Installing the switch
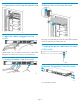
9 Attach the brackets to the new switch
Use a #2 Phillips screwdriver.
10 Plug the power cable into the back
of the switch
11 Install the clip nuts in the rack
If you are replacing the switch, skip this step because the clip nuts will
already be installed.
Install the clip nuts at the 41C position in the rack.
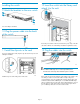
12 Insert the switch into the library and
attach it to the rack
Route the power cable so that it can reach to the power strip on the left
side of the cabinet. Use a #2 Phillips screwdriver to tighten the screws.
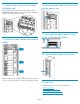
13 Plug the cables into the switch
NOTE:
If an LTO4 or LTO5 tape drive is not already installed, follow
the instructions on the tape drive installation poster to install it.
If the switch was previously installed, use the labels on the cables or the
note that you wrote to reconnect the cables exactly as they were
connected before. If you are installing the switch for the first time, plug
an Ethernet cable from the MGMT port on each LTO4 and LTO5 tape
drive to a numbered port on the switch. HP recommends that you connect
the tape drives in order starting with connecting the top tape drive to
port 1. LTO3 tape drives do not connect to this switch.
Page 3