
HP StorageWorks EML E-Series e2400-FC 2Gb Interface Controller Replacement Instructions (AD560-96031, September 2007)
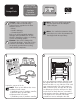

NO TE: This installation process
assumes the tape drives have already
been installed.
Reconnect the cables to the new interface
controller exactly as they were connected to
the original interface controller. If you are
running the Hardware Replacement Wizard
(see step 3), connect all cables except the
FC0 and FC1 host ports. If you are not
running the Hardware Replacement Wizard,
connect all cables.
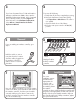
9
LTO4
LTO3
If you are running the Hardware Replacement Wizard
(see step 3), leave this cable unplugged for now.
10
Power on the library.
a. Set the library power switch at the upper
right corner to the ON position.
b. Observe that all power indicators on the
power supplies show that power is
restored.
c. Wait 10 minutes.
d. Verify that the library robotics controller
card ACTIVE indicator is lit. (The library
robotics controller is the top card in the
card cage in the base module.)
11
In this step, Command View TL or the Interface
Manager card will make sure that all interface
controller settings have been retained during the
interface controller replacement.
If you are running the Command View TL
Hardware Replacement Wizard (see step 3),
complete it now by following the instructions on
the screen.
If you are not running the Command View TL
Hardware Replacement Wizard, but your
Interface Manager card contains firmware
version I200 or later, connect to the Interface
Manager card using serial or telnet and start
the CLI replacement wizard by executing the
replace interface command.
If you are not running the Command View TL
Hardware Replacement Wizard and your
Interface Manager card contains a firmware
version earlier than I200, connect to the Interface
Manager CLI and wait for any automatic FRU
management processes to complete before
continuing.
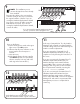
12
Verify that the power and link LEDs are solid
green. The link LEDs indicate a good connection.
LTO3
LTO4