
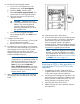
HP Enterprise EML E-Series LTO4 or Later Tape Drive Replacement Instructions
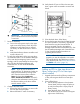
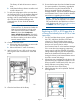


5. Disconnect the FC cable from the drive to be
replaced by pressing down on the cable
connector tab and pulling the connector away
from the drive.
6. Disconnect the other end of the FC cable from the
interface controller card.
CAUTION: Leave the interface controller
in the library, even if the interface controller
has no drives connected to it, to maintain
proper airflow.
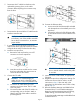
7. If necessary, use a screwdriver to loosen the
captive screw at the right side of the drive module.
Grasp the drive and pull it from the drive bay.
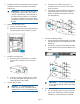
8. Install the new tape drive.
a. Remove the end cap from the port A FC
connector on the new tape drive.
b. Insert the new drive module into the vacant
drive bay and tighten the captive screw to
secure the drive to the chassis.
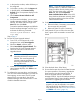
9. Connect the FC cable.
CAUTION: To avoid damaging FC
cables, do not pinch or bend the cables
sharper than a 5 cm (2 inch) diameter loop.
a. Connect an FC cable to the port A FC
connector on the new drive. The FC cable
clicks into place.
b. Connect the other end of the FC cable to its
corresponding port on the SAN. Attach a
label to each end of the cable to mark the
port designations.
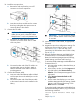
10. Connect the Ethernet cable.
a. Insert one end of the Ethernet cable included
with the tape drive to the MGMT port on the
tape drive.
b. Connect the other end of the Ethernet cable
to the internal network switch installed in the
library.
IMPORTANT: Do not connect the MGMT
port or internal network switch to the public
or site LAN.
11. Insert new LTO4 or later media, as appropriate,
if desired.
12. Migrate the tape drive configuration settings. For
IM firmware version I240 or earlier, use the
instructions in Step 13 (the next step in this
procedure); for IM firmware version I250 or later,
skip to Step 14.
13. Reset the Interface Manager card defaults from
Command View TL or the Interface Manager.
Retain the Interface Manager Network Settings,
SNMP Settings, and Trace and Event logs.
To reset the Interface Manager card defaults from
Command View TL:
Page 6