
HP Enterprise EML E-Series LTO4 or Later Tape Drive Replacement Instructions


The library will take 20 minutes or more to
boot.
b. Verify that the library robotics controller card
Active indicator is lit.
9. To verify the configuration of the new tape drive,
use Command View TL or the Interface Manager
CLI to enter the host mapping/access control,
topology, and FC speed settings for the new tape
drive. See the HP Interface Manager and
Command View TL User Guide for detailed
instructions.
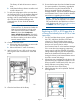
NOTE: If you do not see the drive in
Command View TL, determine whether the
library found the drive by looking at the
OCP: from the Home screen, select the
Status tab, then select Component
Status+Individual Drive Status. If the OCP
shows the drive information correctly, check
the Ethernet cabling to the drive and the
internal network switch.
10. Configure the SAN switch.
a. Rezone the SAN, if necessary, to account for
the new tape drive and paths.
b. Reboot the SAN FC switch if necessary.
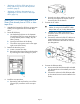
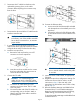
11. Verify that the FC port A LED on the new tape
drive is green when connected to a switch and
linked.
12. Close the back doors of the library.
13. Ensure that the tape drive has the latest firmware
for correct operation. If necessary, upgrade the
drive firmware using the Command View TL
firmware upgrade wizard or the Interface
Manager card CLI. See the HP Interface Manager
and Command View TL User Guide for detailed
procedures on upgrading drive firmware.
NOTE: After a drive replacement or firmware
upgrade, you may be required to run specific
OS commands from the HPUX host in order to
verify the drive path. See “Ensure the new drive
is CLAIMED and online” (page 12).
Replacing an LTO2 or LTO3 tape drive in
a library that already has an LTO4 or later
tape drive
1. For LTO5 and later drive support, upgrade the
IM, CVTL, and library firmware to the latest
versions. For LTO4 and earlier drive support,
record library settings if the Interface Manager
firmware is at version I240 or earlier.
Use Command View TL or the Interface Manager
CLI to write down host mapping, partitioning,
access control, and Fibre Channel (FC) speed
settings before beginning the drive replacement.
Because the hardware and device paths will
change, the library save/restore features cannot
be used to re-enter old settings.
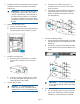
2. Unload any tape cartridges from the drive to be
replaced using your application software or the
library Operator Control Panel (OCP). Use your
backup software to stop library activity.
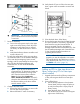
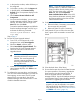
3. Open the back doors of the library.
4. Identify the tape drive to be replaced. The fault
LED might be lit.
Page 5