
Installing Microsoft Windows on an HP ProBook or EliteBook Notebook PC and creating an image


Building a common ima ge
Instructions are provided for building W indows XP Professional and W indows Vista Business ima ges.
W indows XP Professional
1. Install W indows XP Professional on a supported platform.
2. Install the following and then reboot the system:
– Essential System Updates for W indows XP
– S y stem Defa ult S e tti ng s
– Microsoft Universa l Audio Arc hite c ture (U A A ) High Definition Audio class driver (not required
for XP SP3)
– Microsoft .N ET (refer to Table 1 for .N ET version requirements)
3. C opy the i386 folder from the W ind o w s XP installation DVD to the root of %SystemDrive%.
4. Extract deploy.cab from the SUPPO RT\ TOOLS\ folder of the install DVD to the
%SystemDrive%\ sysp r ep folder.
5. Copy all device drivers to the %SystemDrive%\ DRV folder.
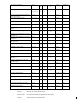
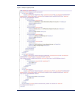
6. As shown in Figure 1, create an install.bat file that contains the following:
– Authentec Fingerprint Driver
– HP Q uick Launch Buttons
– Intel Matrix Storage Manager
– H P M ul t i -W W AN Driver Installer
Silence the install command in the %SystemDrive%\ DRV folder.
Fi g u r e 1. Creating an install.bat file
7. Run setupmgr.exe from the %SystemDrive%\ sysprep folder to create a sysprep.inf file.