
Data Protector NDMP Integration Quickstart Guide

8
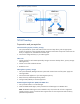
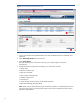
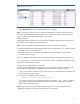
Figure 5: HP X9000 Network Storage Gateway Administration GUI
1. Log on to the HP X9000 web management GUI. Enter the administrator user credentials and
password.
2. Select Cluster Configuration in the navigator list.
3. Select NDMP Backup in the Cluster Configuration.
4. Click Modify and make the necessary changes in the web form that appears. This includes the
following details:
NDMP Sessions = Yes
Listener Port Number (typically the port is 10000)
Username and Password (must be a user with appropriate backup user rights)
DMA (NDMP client) IP Addresses
Enable NDMP Sessions = 1
Note: The remaining configuration items can be left unmodified.
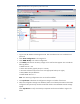
5. Click Synchronize to distribute the configuration changes to all nodes of the cluster.
6. When the configuration changes are distributed, make sure all backup libraries that have been
configured in the previous step are discovered and visible on the HP X9000 Network Storage
System.
Select Tape Devices to verify which backup components are discovered. Refer to Figure 6 for
details.