
HP StorageWorks Using Hummingbird Maestro Server with the HP Windows Clustered Gateway Application Notes (432208-001, October 2006)


10
Configure Clustered File System services
You can now configure CFS services by performing these steps:
1. Install the nfsmon.vbs script on each node. This script is provided with the deployment kit.
2. Create virtual hosts. NFS clients use the virtual hosts to access the exported PSFS file systems.
3. Create a CUSTOM service monitor for each virtual host. This monitor watches the NFS service on the
primary and backup nodes.
Install the custom script
The deployment kit includes a custom script called nfsmon.vbs. This script is used by the CUSTOM service
monitor to determine whether the NFS service is running on the primary and backup servers for the
associated virtual host.
You need to install the nfsmon.vbs script on each server. Create a c:\scripts folder on each system
and place the script in that directory.
Create virtual hosts
To begin, determine how you want to export your PSFS file systems. For each exported file system, select
one node to be the primary server. You need to create a separate virtual host on each node that will be the
primary server for one or more file systems.
When configuring a virtual host, you specify the primary node and one or more backup nodes. Additional
options are also available, as described in the HP StorageWorks Clustered File System for Windows
administration guide.
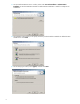
To create a virtual host:
1. Open the HP CFS Management Console.
2. Select Cluster > Add > Add Virtual Host (on CFS for Windows 3.4 and later) or Cluster > Virtual Host >
Add Virtual Host (on CFS for Windows 3.2.1 and earlier). You can also click the V-Host icon on the
toolbar, and then configure the virtual host on the Add Virtual Host window.
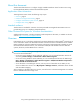
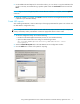
As an example, we will create two virtual hosts. The first virtual host, shown in the following window,
assigns node 5 (10.12.10.5) as the primary and node 6 (10.12.10.6) as the first backup. The application
name is NFS_File_Serving.