HP StorageWorks Using Hummingbird Maestro Server with the HP Windows Clustered Gateway application notes Part number: 432208-001 First edition: October 2006
Legal and notice information © Copyright 2006 Hewlett-Packard Development Company, L.P. Hewlett-Packard Company makes no warranty of any kind with regard to this material, including, but not limited to, the implied warranties of merchantability and fitness for a particular purpose. Hewlett-Packard shall not be liable for errors contained herein or for incidental or consequential damages in connection with the furnishing, performance, or use of this material.
About this document This document describes how to configure a highly available Windows® cluster for NFS services using Hummingbird NFS Maestro and the HP Clustered File System.
NFS Maestro can be used to export a Clustered File System (CFS). NFS Maestro is installed on each node that provides NFS services and is then configured to export the appropriate file systems. NFS Maestro then creates the shares used for the export. Note that an individual file system should be exported by only one node at a time. The supported cluster configuration is one active node exporting the file system and one or more nodes acting as backups.
Install and configure NFS Maestro Before installing NFS Maestro, you need to install and configure CFS as described in the Clustered File System documentation. Complete these steps as described in the following sections to install and configure NFS Maestro: 1. Install NFS Maestro. 2. Create an NFS export of the appropriate Polyserve file system (PSFS). 3. Set the Hummingbird NFS Maestro Server service startup type to manual.
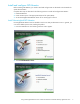
3. On the Install NFS Maestro Server window, select either Personal Installation or Administrative Installation to start the Installation Wizard. The Administrative Installation is useful for multiple server installations. 4. The Installation Wizard asks you to specify where the product should be installed. The default location should be fine. Click Next. 5. On the Setup Type window, select Typical, and then click Next.
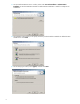
6. On the Additional Install Options for the Product window, you can choose to copy the installation files locally in case they are needed during a product update. Select the Local Cache check box and click Next. NOTE: To go to the Hummingbird Update web site after the installation is complete, select the Updates check box. 7. When the installation is complete, click Finish to close the wizard. A Hummingbird Connectivity shortcut is placed on your Windows desktop.
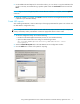
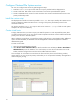
4. Pick a directory from the Browse window (the Z drive in our example). The directory that you select must be on a previously created PSFS. 5. The default export permission is set for read/write. To change it to read-only, click Properties and go to the General tab.
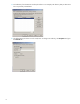
6. In the configuration utility, select the Advanced tab to access additional settings. For example, you can disable the lock daemon if desired. This might be ideal in a clustered environment. Set Windows service to manual Verify that the Hummingbird NFS Maestro Server service startup type is set to Manual. The NFS server must be started after the CFS is up and running. The NFS service is dependent on CFS volumes for exporting and should not start before CFS. 1.
Configure Clustered File System services You can now configure CFS services by performing these steps: 1. Install the nfsmon.vbs script on each node. This script is provided with the deployment kit. 2. Create virtual hosts. NFS clients use the virtual hosts to access the exported PSFS file systems. 3. Create a CUSTOM service monitor for each virtual host. This monitor watches the NFS service on the primary and backup nodes.
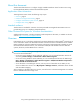
The following window shows the configuration for the second virtual host (10.12.10.151). Note that the primary and backup roles have been reversed; node 6 is the primary and node 5 is the backup. This virtual host uses the same application name, NFS_File_Serving, as the first virtual host. (The application name is simply a tag for grouping resources on the Applications tab. You can use any naming scheme that you want.
Create Service Monitors You need to create a service monitor on each virtual host. 1. Select the virtual host on the HP CFS Management Console, right-click, and select Add service monitor. 2. Select CUSTOM as the monitor type and complete the remaining fields as follows: Name: Enter HUMNFSServer as the name of the monitor. Timeout: Accept the default value (60 seconds). Frequency: Accept the default value (60 seconds). User probe script: Enter the following line.
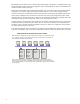
The following example shows the service monitors created for the two sample virtual hosts. If a monitor detects that the primary server is down, or that the NFS service is down on that server, it will fail over the associated virtual host to the backup server. Configure NFS clients NFS clients access PSFS file systems by specifying a virtual host and the shared file system.