
HP StorageWorks Clustered File System 3.6.1 File Serving Option for Windows administration guide (AG515 - 96008, August 2008)


Chapter 4: Configure Virtual CIFS Servers 35
Delete a Virtual CIFS Server
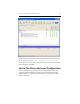
To remove a Virtual CIFS Server, select that Virtual CIFS Server on the HP
CFS Management Console, right-click, and select Delete.
You can also enter the following at the Command Prompt:
mx vfs delete <ip>|<name>
Disable or Enable a Virtual CIFS Server
By default, Virtual CIFS Servers are enabled. If you disable a currently
active Virtual CIFS Server, any associated Virtual File Share monitors on
the node where the Virtual CIFS Server is active will go through their
stopping activities and the Virtual CIFS Server will become inactive
throughout the cluster.
To disable a Virtual CIFS Server, select the Virtual CIFS Server on the HP
Management Console, right-click, and select Disable On All Servers.
To enable a previously disabled Virtual CIFS Server, select the Virtual
CIFS Server on the HP Management Console, right-click, and select
Enable.
You can also enter the following at the Command Prompt:
mx vfs enable <ip>|<name>
mx vfs disable <ip>|<name>
Display Status for a Virtual CIFS Server
Use the following command to see the status for a Virtual CIFS Server:
mx vfs status [arguments] <ip>|<name>
The arguments are:
[--up|--down]
[--enabled|--disabled]
[--primary|--backup]
[--active|--inactive]