
HP StorageWorks Clustered File System 3.6.1 File Serving Option for Windows administration guide (AG515 - 96008, August 2008)


Chapter 4: Configure Virtual CIFS Servers 21
Configuration Steps
Perform the configuration in this order:
• Create PSFS cluster filesystems to store the files that will be shared via
CIFS. For each filesystem, you will need to assign a drive letter or path
that will be used to access the filesystem. See the HP Clustered File
System Administration Guide for details about creating and configuring
filesystems.
• Create a Virtual CIFS Server, specifying a primary node. Depending
on your configuration, you may also want to specify one or more
backup nodes for this Virtual CIFS Server.
• Add Virtual File Shares to the virtual server. Be sure to create the
Virtual File Shares on the HP Management Console; you should not
use Windows applications such as Explorer to do this.
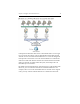
When you plan your configuration, keep in mind that all Virtual File
Shares added to a particular Virtual CIFS Server are active on the node
where the Virtual CIFS Server is active. Similarly, when the Virtual CIFS
Server fails over, those Virtual File Shares become active on the backup
node and will be accessed from there.
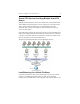
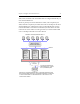
You may want to create multiple Virtual CIFS Servers to spread the CIFS
activity across the cluster, taking advantage of the scalability of the HP
solution. Remember, a node can simultaneously be primary for some
Virtual CIFS Servers and a backup for other Virtual CIFS Servers.
DNS Requirement for Virtual CIFS Servers
A DNS entry must exist for each Virtual CIFS Server/IP address. The
entry must include an A record and a [PTR] record for forward and
reverse lookup. Windows authentication may fail if these records do not
exist. Be sure to create a DNS entry for each Virtual CIFS Server/IP
address that you create.