
HP StorageWorks Clustered File System 3.6.0 Windows Storage Server Edition Setup Guide (403102-005, January 2008)


Chapter 4: Other Procedures 47
NOTE: This procedure does not require any down time. Repeat this
procedure on each server in the cluster.
Upgrade One Server and Export
This procedure requires that HP Clustered File System be stopped on all
servers. Execute the procedure on one server in the cluster.
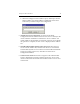
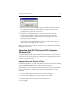
1. On one server, select Start > Programs > HP Clustered File System >
Management Console. On the Connection Parameters window that
opens next, enter the IP address of the server, type the user and
password, and then click the Configure button.
NOTE: If there is a .matrixrc file on the system running mxconsole,
you will see a Disconnect dialog instead of the Connection
Parameters window. Select “Logon to another cluster server”
and then click Configure.
2. Select the Cluster Wide Configuration tab, and then stop the service
on all nodes.
3. Return to the General Settings tab and select Change License File.
4. Type the path to the new license file or browse to it.
5. Click Apply.
6. Start the cluster service when prompted. (This starts the service on the
connected node.)
7. Export the configuration to all other servers.
8. Start the HP Clustered File System service on all other nodes.