
HP StorageWorks Clustered File System 3.6.0 Windows Storage Server Edition Setup Guide (403102-005, January 2008)


Chapter 3: Setting Up HP StorageWorks Clustered File System 13
If you will be using a client PC outside the cluster to administer your
cluster, you will also need to install the stand-alone Management Console
package on that PC.
1. Set iLO configuration during boot
When booting, press F8 to enter the iLO configuration mode. Set the
network information (IP address) and user/password. This will be used
for iLO based fencing setup later on.
2. Set Up the DNS Hostname
Each server running HP Clustered File System must be able to resolve its
hostname in DNS. HP Clustered File System uses the first address
returned by DNS as the server’s name in the cluster.
When configuring DNS, keep the following guidelines in mind:
• If you have multiple public networks across the cluster, only one of
the interfaces should be registered in DNS, and all nodes need to be
registered on the same network.
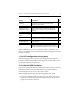
Configure FC switches if
necessary.
The FibreChannel switches that will be under cluster
control need to be configured to enable cluster
operations across the SAN.
Create LUNs or disk
partitions for use as
membership partitions.
Create LUNs for HP Clustered File System membership
partitions. Also make any necessary changes to the
partition tables on disks that will contain membership
partitions.
Log into the iSCSI
targets (iSCSI Storage
only).
On each server, log into the iSCSI targets via the iSCSI
initiator.
Run the mxcheck utility. This utility verifies that the server’s configuration meets
the requirements for running HP Clustered File System.
Install snapshot
software (optional).
This step is needed only if you will be using the hardware
snapshot feature.
Configure the cluster. Create an initial cluster configuration on one server,
export that configuration to the other servers, and then
start the HP Clustered File System service on all servers.
Action Description