
HP StorageWorks Clustered File System 3.6.0 Windows Storage Server Edition Installation Guide (418975-003, January 2008)


Chapter 3: Install HP StorageWorks Clustered File System 16
If you will be using a client PC outside the cluster to administer your
cluster, you will also need to install the stand-alone Management Console
package on that PC.
1. Set Up the DNS Hostname
Each server running HP Clustered File System must be able to resolve its
hostname in DNS. HP Clustered File System uses the first address
returned by DNS as the server’s name in the cluster.
When configuring DNS, keep the following guidelines in mind:
• If you have multiple public networks across the cluster, only one of
the interfaces should be registered in DNS, and all nodes need to be
registered on the same network.
• Do not list any DNS servers for the private (non-routed or non-client
reachable) NICs. For the private NICs and any other public NICs,
uncheck the configuration option to “register this connection’s
addresses in DNS.”
• If you are using dynamic DNS, we recommend that you choose one
public NIC to set up as a DNS client. Then list the DNS server(s) in the
configuration for this NIC. (Static DNS entries may be preferable to
dynamic DNS.)
• If you are using DHCP, be sure to use DHCP reservations so that the
servers’ IP addresses will not change over time.
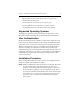
Run the HP mxcheck
utility.
This utility verifies that the server’s configuration meets
the requirements for running HP Clustered File System.
Install HP Clustered File
System.
Install the software on each server that will be in the
cluster.
Install snapshot
software (optional).
This step is needed only if you will be using the hardware
snapshot feature.
Configure the cluster. Create an initial cluster configuration on one server,
export that configuration to the other servers, and then
start the HP Clustered File System service on all servers.
Action Description