
HP StorageWorks Clustered File System 3.6.0 File Serving Option for Windows Administration Guide (403104-005, January 2008)

Chapter 4: Configure FS Option for Windows with Virtual CIFS Servers 36
Linux Clients
Linux clients can mount Virtual File Shares using the Virtual CIFS Server
address. If a mount command fails with the message “Connection
Refused,” retry the command with the port=445 option. Following is an
example:
# mount -t smbfs -o ‘username=Administrator,uid=Administrator,port=445’
//10.11.200.200/temp /try1
Other Procedures
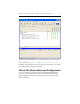
Virtual CIFS Servers
These procedures can be performed from the HP CFS Management
Console or the command line. On the Management Console, select the
Virtual CIFS Server on the Servers, Virtual Hosts, or Applications tab and
then right-click to display a menu listing the available options.
Modify the Configuration
To modify the configuration of a Virtual CIFS Server, select that Virtual
CIFS Server on the HP CFS Management Console, right-click, and select
either Properties or Rehost. You can add or remove interfaces from the
Virtual CIFS Server configuration and can reorder the interfaces. If you
designate a new primary interface, the service will automatically be
moved to that interface.
You can also change the configuration at the Command Prompt:
mx vfs update [--policy autofailback|nofailback] [<ip>|<name>]
[ALL_SERVERS <primary_interface>|<node1_IP> <node2_IP>
<nodeN_IP>]
This command allows you to add or remove interfaces from the Virtual
CIFS Server configuration and to reorder the interfaces. If you specify a
different primary interface and --policy is set to autofailback, the
command will automatically move the service to the new primary.
If --policy is set to nofailback, the update command will not move the
service to the new primary. You will then need to use the vfs move
command shown below to move the service.
mx vfs move <ip>|<name> <target_networkinterface>