
HP StorageWorks Clustered File System 3.2.1 Windows Storage Server Edition Setup Guide (February 2006)


Chapter 3: Setting Up HP StorageWorks Clustered File System 30
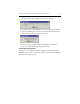
Repeat this procedure to add the remaining servers to the Address
column.
2. Export the configuration. Click Select All to select all of the servers in
the Address column, and then click Export. The Last Operation
Progress column displays status messages as the configuration is
exported to each server.
If you are using Web Management-based (iLO) fencing, you may be
asked for additional information about each server. Based on the
entries you made on the Fencing tab, the information can include any
or all of the following: the vendor/type for the Remote Management
Controller, the IP address/hostname of the Remote Management
Controller, the username and password for the Remote Management
Controller.
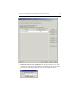
3. Start HP Clustered File System on the remaining servers. The
servers to which you exported the configuration will still be selected
in the Address column. Click Start Service to start HP Clustered File
System on those servers. As each server is started, a status message is
displayed in the Last Operation Progress column.
When HP Clustered File System is running on all of the servers, you can
close the Server Configuration window.
The installation is now complete. See the HP StorageWorks Clustered File
System Administration Guide or the HP Management Console online help
for information about configuring the cluster components.
Test the Fencing Configuration
The Test Fencing button on the Cluster Wide Configuration tab can be
used to verify that the fencing configuration is correct for each server.
This feature is particularly useful for Web Management Based Fencing
via Server Reset/Shutdown.
On the Cluster Wide Configuration tab, select one or more servers to test
and click the Test Fencing button. (You cannot select the server being
used to connect to the Management Console.)