
HP ProLiant DL100 G2 Data Protection Storage Server Rack Installation Instructions (December 2005)

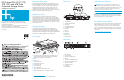


1 Slide rail installation
NOTE: Depending on the rail kit provided, your rackmount rail
assemblies may vary slightly from those in the following illustrations.
1. Install the two slide rails to the sides of the rack.
NOTE: Two different types of rail kit designs are shown in the
illustration below, but both install similarly. Within a kit, the two rail
assemblies are identical, but depending on the side of the rack, are
rotated so the sliding portions of the rails are towards the center of the
rack.
a. Adjust the side rail assemblies to the approximate rack depth.
b. At one side of the rack, align the rail holes with the holes in the
rack and secure with the provided mounting hardware.
IMPORTANT: HP recommends leaving the rail mounting screws
loose until the server is completely installed. This eases installation by
preventing binding of the server in the rack.
c. Align holes at the other end of the rack with the rail assembly
and secure with mounting hardware.
d. Install the other side rail assembly on the other side of the rack
as described in the previous steps.
2. Locate the inner slide rails:
• If the rail assembly you mounted in the rack comes as one unit,
remove the inner slide rails from the outer slide rails. To do so,
extend the inner slide rails from the front of the rack until they
lock in place. Then, press the inner rail release latch, as shown,
and pull the inner slide rails straight out.
.
• If the inner slide rails in your kit are separate from the rail
assemblies installed in the racks, remove them from the kit box
and proceed to the next step.
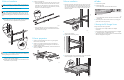
2 Server preparation
1. Attach the two bezel brackets to the server using the supplied
bracket screws, as shown 1.
2. Attach an inner slide rail (lock facing out) to each side of the
server. Insert the slide rail screws through the inner slide rails as
shown 2, and then tighten.
3. Attach the bezel 3 to the bezel brackets, and then lock the bezel to
the server (if desired).
3 Server installation
1. Extend the outer slide rails fully from the rack until they lock. Insert
the inner slide rails (with the server attached) into the outer slide
rails, as shown 1. Press the inner slide lock 2, and then push the
server all the way into the rack, making sure that the inner slide
rails lock into place.
2. Slide the server in and out of the rack several times, allowing the
rails to position properly.
3. Tighten all the rail mounting screws.
.
4. Push the server fully into the rack 1. Insert a screw into each bezel
bracket and tighten to secure server to the rack 2.
.
4 Cables
1. Install networking cables.
2. Install the MSA cable.
• For the 3TB model, install the MSA cable as shown.
• For the 6TB model, install the cable for the second MSA in the
adjacent slot.
3. Connect the power cord to the back of the server, and plug the
power cord into the rack power strip.
5 Starting the DP Storage Server
To begin the first-time startup procedure:
• Ensure that the server is safely installed in an adequate
environment.
• Ensure that the power cables and peripheral devices are plugged
in, and that AC power is supplied to the server.
• See the DP Storage Server startup chapter in the HP ProLiant Data
Protection Storage Server user guide.
5201b
10685A
5202
1
1
2
2
3
5203A
2
1
5205
5204a
2
1