
Installation Guide, Second Edition - HP Carrier Grade Blade Server bh3710


Chapter 2
Unpacking and Installing the hp Carrier Grade Blade Server bh3710
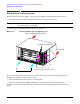
Installing the bh3710 Blade Server in a Rack
2-2
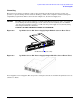
Step 1. Unpack the blade server from its shipping container.
Step 2. Compare the contents with the packing list to ensure that all required components have been
received, as listed in Table 2-1.
Step 3. Use two or more people, or a mechanical device, to move the blade server to the installation site.
Step 4. Prepare the rack for mounting the blade server chassis.
NOTE Quantity depends on ordered configuration.
Installing the bh3710 Blade Server in a Rack
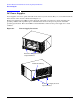
The racking kit enables the installation of the bh3710 chassis into a rack. Rack kit installation
documentation is shipped with each server inside the rack kit box. Racking information may also be found at
the Web site: http://www.hp.com/racksolutions.
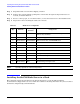
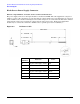
Table 2-1 Blade Server Components
Qty Part No.
Exchange
Part No.
Component
1 A6715-62001 A6715-69003 6 EIA unit blade server chassis with backplane and
N+1 fan tray assembly
2 A6790-62004 A6790-69004 DC power supply
2 A6780-60001 A6780-69001 Fibre channel (FC) and LAN RTM blade
1-4 5065-7804 A6783-69001 18GB fibre channel disk
1-2 A6711-62001 A6711-69001 FC disk carriers
2 to 4 A6709-60001 A6709-69001 256 MB DIMM
1 A6708-62001 A6708-69001 bp2200 Blade (2 slot) (front load only)
1 A6712-60001 A6712-69001 Management blade
0 to 2 A6707-00014 N/A DIMM filler (for bp2200 server blade)
1 A6715-70001 N/A Kit, spare slot blockers (2 front, 2 rear)
2 A6715-63001 N/A DC external power input cable