FTP Server Configuration For HP customers who need to configure an IIS or FileZilla FTP server before using HP Device Manager Technical white paper
© Copyright 2012 Hewlett-Packard Development Company, L.P. Microsoft and Windows are U.S. registered trademarks of Microsoft Corporation. Confidential computer software. Valid license from HP required for possession, use or copying. Consistent with FAR 12.211 and 12.212, Commercial Computer Software, Computer Software Documentation, and Technical Data for Commercial Items are licensed to the U.S. Government under vendor's standard commercial license.
Table of contents Overview ............................................................................................................................................ 4 IIS FTP server configuration ................................................................................................................... 4 Installing FTP v7.5 for IIS ...................................................................................................................
Overview This document contains two parts: • The first part discusses the configuration of IIS FTP. It includes IIS FTP installation, configuration of an FTP site with basic authentication, passive mode configuration, external IPv4 address configuration, and Windows Firewall settings. • The second part discusses the configuration of Filezilla FTP Server. It includes Filezilla FTP Server installation and configuration of an FTP site. IIS FTP server configuration Installing FTP v7.
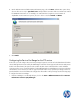
4. On the Site Information page, enter a name for the FTP site, and browse and select a path on the local system to use as the Content (or root) directory. In this example, we will use the site name of “HPDM-Repository” and provide the root path of “C:\inetpub\ftproot”. NOTE: Please ensure that the user account being used for HPDM FTP transactions has sufficient rights to allow reading, writing, and directory listing on the folder selected for the Content (or root) directory. 5. Click Next.
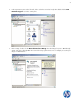
6. On the Binding and SSL Settings page, enter or modify the details for your particular needs. In our example, we kept the default values for IP Address and Port, “All Unassigned” and “21” respectively. We did not select Enable Virtual Host Names and selected No SSL. NOTE: Configuration of Secure Sockets Layer (SSL) FTP is beyond the scope of this document. 7. Click Next.
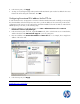
8. On the Authentication and Authorization Information page, select the Basic authentication option. Then, select to allow access only to Specified users and provide the username of the account that was created for HPDM FTP transactions. In our example, we created and are using the account username of “hpdmadm”. For the Permissions options, be sure to click to select both Read and Write. 9. Click Finish.
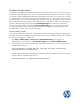
2. In the Connections pane on the left side, click to select the server-level node, then double-click the FTP Firewall Support icon in the center pane. 3. Enter a range of values for the Data Channel Port Range. The valid range for ports is 1024 through 65535. Ports from 1 through 1023 are reserved for use by system services. For our example, we use the port range of “49152-65535”.
4. In the Actions pane, click Apply. 5. You may see a warning message at this point that indicates that the ports need to be added to the server firewall. We will be doing this a little later. Click OK. Configuring the external IPv4 address for the FTP site In order for the FTP site to accept passive connections when the Windows Firewall is enabled, you must specify the external address of the firewall (in most cases this is just the IP address of the server itself), in the FTP site configuration.
Windows Firewall settings In Windows Server 2008 R2, the built-in firewall service is provided to help secure your server from network threats and is enabled by default. If you choose to use the built-in Windows Firewall, you will need to configure your settings so that the HPDM and FTP traffic can pass through the firewall. This section will not only cover how to configure the FTP ports but also the basic ports used by HPDM.
FileZilla FTP server configuration FileZilla is free, open source, cross-platform FTP software, consisting of FileZilla Client and FileZilla Server. We just need FileZilla Server here. 1. Download FileZilla Server at http://filezilla-project.org/. Select Download FileZilla Server.
2. Select the Windows platform. 3. Download this file to the specified location of the server system, and double-click this file to install it.
4. Click I Agree. 5. Click Next.
6. Set the destination folder, then click Next. 7. Click Next.
8. Click Install. 9. After the installation is complete, click Close.
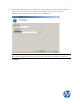
10. There will be a connected FileZilla Server dialog. 11. From the menu, select Edit > Users, and Users dialog will appear. Select the General page, and click the Add button to add a user.
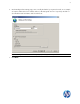
12. Input a user name, then click OK. 13. Check the Password option, then input your password.
14. Select the Shared folders page, then click the Add button to add a shared folder. 15. Select the shared folder, then click OK.
16. Back on the User dialog, check Read, Write, Delete, and Append options in Files panel, and check Create, Delete, List, and + Subdirs options in Directories panel, then click OK. 17. The FTP server has been created, and we see this FTP service by inputting services.msc in the Windows “Run” dialog. 18. The service of the FileZilla Server FTP server has been started.