HP Deskjet 3050 All-in-One series
1 How Do I?..................................................................................................................................3 2 Get to know the HP All-in-One Printer parts................................................................................................................................5 Control panel features................................................................................................................6 Status Lights..........................................
Contents 2
How Do I? Learn how to use your HP All-in-One • • • • • Printer parts Load media Replace the cartridges Clear a paper jam WiFi Protected Setup (WPS) How Do I? 1 How Do I? 3
Chapter 1 How Do I? 4 How Do I?
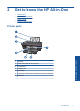
2 Get to know the HP All-in-One • • • • Printer parts Control panel features Status Lights Wireless Status Light 1 Input tray 2 Paper-width guide for the input tray 3 Control panel 4 Cartridge door 5 Output tray 6 Output tray extender (also referred to as the tray extender) 7 Cartridges Get to know the HP All-in-One Printer parts Printer parts 5
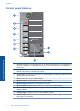
Chapter 2 Control panel features WIRELESS ! Get to know the HP All-in-One 6 1 On button and light: Turns the product on or off. When the product is off, a minimal amount of power is still used. To completely remove power, turn off the product, then unplug the power cord. 2 Cancel: Stops the current operation. Returns you to previous screen of printer display. Returns copy settings to default copy settings. 3 Quick Forms: Shows Quick Forms menu on printer display.
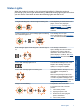
Status Lights When the product is turned on, the on button light will be lit. When the product is processing a job, the on light will be blinking. Additional blinking lights signal errors that you can resolve. See below to learn about blinking lights and what to do. Behavior Solution On light is blinking fast + Attention light is blinking fast The output tray is closed, there is no paper, or there is a paper jam. Prepare the trays, correctly Load media, or Clear a paper jam.
Chapter 2 (continued) Behavior Solution If the problem persists, contact HP support. Wireless Status Light Light behavior Solution Off Wireless signal off. Press wireless button to access wireless menu on the printer display. Use wireless menu to enable wireless printing. Blinking Indicates printer is searching for a wireless connection. Wait for connection to be established. If connection cannot be established, make sure printer is within range of wireless signal.
3 Print Choose a print job to continue. Print documents Print photos Print envelopes Print documents To print from a software application 1. Make sure the output tray is open. 2. Make sure you have paper loaded in the input tray. Print See Load media for more information. 3. From your software application, click the Print button. 4. Make sure the product is the selected printer. 5. Click the button that opens the Properties dialog box.
Chapter 3 6. Select the appropriate options. • On Layout tab select Portrait or Landscape orientation. • On Paper/Quality tab select the appropriate paper size and paper type from the Paper Size and Media drop-down lists. • Click Advanced to select the appropriate output quality from the Printer Features list. 7. Click OK to close the Properties dialog box. 8. Click Print or OK to begin printing. NOTE: You can print your document on both sides of the paper, instead of just one side.
5. Click the button that opens the Properties dialog box. Depending on your software application, this button might be called Properties, Options, Printer Setup, Printer, or Preferences. 6. Select the appropriate options. • On Layout tab select Portrait or Landscape orientation. • On Paper/Quality tab select the appropriate paper size and paper type from the Paper Size and Media drop-down lists. • Click Advanced to select the appropriate output quality from the Printer Features list.
Chapter 3 5. Slide the paper guide firmly against the edge of the envelopes. 6. Click the button that opens the Properties dialog box. Depending on your software application, this button might be called Properties, Options, Printer Setup, Printer, or Preferences. 7. Select the appropriate options. • On Paper/Quality tab select a Plain paper type and the appropriate envelope size from the Paper Size drop down menu. . • Click Advanced to select the appropriate output quality from the Printer Features list.
Paper loading tips • Load a stack of paper (not just one page). All of the paper in the stack should be the same size and type to avoid a paper jam. • Load paper with side to be printed on facing up. • Ensure that paper loaded in the input tray lays flat and the edges are not bent or torn. • Adjust the paper-width guide in the input tray to fit snugly against all paper. Make sure the paper-width guide does not bend the paper in the input tray. • For more information, see Load media.
Chapter 3 • You can print your document on both sides of the paper, instead of just one side. NOTE: Click the Advanced button on the Paper/Quality or Layout tab. From the Pages to Print drop-down menu select Print Odd Pages Only. Click OK to print. After the odd numbered pages of the document have been printed, remove the document from the output tray. Reload the paper in the input tray with the blank side facing up. Return to the Pages to Print drop-down menu and then select Print Even Pages Only.
4 Paper basics You can load many different types and sizes of paper in the HP All-in-One, including letter or A4 paper, photo paper, transparencies, and envelopes. Load media Recommended papers for printing If you want the best print quality, HP recommends using HP papers that are specifically designed for the type of project you are printing. Depending on your country/region, some of these papers might not be available.
Chapter 4 HP Brochure Paper or HP Superior Inkjet Paper These papers are glossy-coated or matte-coated on both sides for two-sided use. They are the perfect choice for near-photographic reproductions and business graphics for report covers, special presentations, brochures, mailers, and calendars. Paper basics HP Premium Presentation Paper or HP Professional Paper These papers are heavy two-sided matte papers perfect for presentation, proposals, reports, and newsletters.
Load media ▲ Select a paper size to continue. Paper basics Load full-size paper a. Raise the input tray ❑ Raise the input tray. b. Lower the output tray ❑ Lower the output tray and pull out the tray extender.
Chapter 4 c. Slide paper-width guide to the left ❑ Slide paper-width guide to the left. Paper basics d. Load paper. ❑ Insert stack of paper into input tray with short edge forward and print side up. ❑ Slide stack of paper down until it stops. ❑ Slide paper-width guide to the right until it stops at edge of paper.
Paper basics Load small-size paper a. Raise the input tray ❑ Raise the input tray. b. Lower the output tray ❑ Lower the output tray and pull out the tray extender.
Chapter 4 c. Slide paper-width guide to the left. ❑ Slide paper-width guide to the left. Paper basics d. Load paper. ❑ Insert stack of photo paper with short edge down and print side up. ❑ Slide stack of paper forward until it stops. NOTE: If the photo paper you are using has perforated tabs, load photo paper so that tabs are on top. ❑ Slide paper-width guide to the right until it stops at edge of paper.
Paper basics Load envelopes a. Raise the input tray ❑ Raise the input tray. b. Lower the output tray ❑ Lower the output tray and pull out the tray extender. c. Slide paper-width guide to the left. ❑ Slide paper-width guide to the left.
Chapter 4 ❑ Remove all paper from the main input tray. d. Load envelopes. ❑ Insert one or more envelopes into far-right side of the input tray. The side to be printed on should face up. The flap should be on the left side and facing down. ❑ Slide stack of envelopes down until it stops. ❑ Slide paper-width guide to the right against stack of envelopes until it stops.
5 Copy and scan • • • Copy documents or photos Scan to a computer Tips for copy and scan success Copy documents or photos You can copy with the press of one button. If you want more copy features use the copy menus on the printer display. ▲ Click a copy type to continue. Copy and scan Easy Copy a. Load paper. ❑ Load full-size paper in the paper tray. b. Load original. ❑ Lift lid on product.
Chapter 5 ❑ Load original print side down on right front corner of glass. ❑ Close lid. c. Start copy. ❑ Select Black Copy or Color Copy from the printer display menu to copy onto A4 or 8.5” x 11” plain paper. Copy and scan NOTE: Increase the number of copies by selecting Black Copy or Color Copy multiple times or by holding down the Black Copy or Color Copy button. NOTE: If you don’t see Black Copy or Color Copy on the printer display screen, press the Cancel button until you see these options.
Scan to a computer • • • If your computer is connected to the printer with a USB cable you can quickly scan a photo using the scan button. Pressing the scan button will automatically save the image in a photo format to your computer. If your computer has a wireless connection to the printer, you must first activate the scan application on your computer, before pressing the scan button.
Chapter 5 ❑ Load original print side down on right front corner of glass. ❑ Close lid. Copy and scan c. Start scan. USB connection 1. Press the Scan button on the printer. 2. Locate the scanned photo image on your computer. Wireless connection 1. Open the scan application on your computer. ▲ On your computer, double-click the printer icon on the desktop. ▲ Choose Scanner Actions, and then select Activate Scan to Computer. ▲ Follow the onscreen instructions. 2. Press the Scan button on the printer. 3.
• Load your original print side down on the right front corner of the glass. • If your computer is connected to the printer with a USB cable, just press the scan button on the printer to begin scanning. See Scan to a computer for more information. To scan with a wireless connection make sure that the scan application has been activated on your computer, before pressing the scan button. Clean the scanner glass and make sure that there are no foreign materials adhering to it.
Chapter 5 Copy and scan 28 Copy and scan
6 Work with cartridges • • • • • Check the estimated ink levels Order ink supplies Replace the cartridges Use single-cartridge mode Cartridge warranty information Check the estimated ink levels You can easily check the ink supply level to determine how soon you might need to replace a cartridge. The ink supply level shows an estimate of the amount of ink remaining in the cartridges. To check the ink levels from the Printer Software 1. Click the HP All-in-One desktop icon to open the Printer Software.
Chapter 6 Order ink supplies Before ordering cartridges, locate the correct cartridge number. Locate the cartridge number on the printer ▲ The cartridge number is located inside the cartridge door. Product No. xxxxxx Model No. xxxxx HP Ink Cartridge xx Locate the cartridge number in the Printer Software 1. Click the HP All-in-One desktop icon to open the Printer Software.
Replace the cartridges To replace the cartridges 1. Check power. 2. Load paper. 3. Remove cartridge. a. Open cartridge door. Work with cartridges Wait for print carriage to move to center of the product. b. Press down to release cartridge, then remove it from slot.
Chapter 6 4. Insert new cartridge. a. Remove cartridge from packaging. b. Remove plastic tape using pink pull tab. Work with cartridges c. Slide cartridge into slot until it clicks into place.
d. Close cartridge door. 5. Align cartridges. Related topics • Choose the right cartridges • Order ink supplies Use single-cartridge mode Use the single-cartridge mode to operate the HP All-in-One with only one print cartridge. The single-cartridge mode is initiated when a print cartridge is removed from the print cartridge carriage. During single-cartridge mode, the product can only print jobs from the computer.
Chapter 6 During the warranty period the product is covered as long as the HP ink is not depleted and the end of warranty date has not been reached. The end of warranty date, in YYYY/ MM/DD format, may be found on the product as indicated: For a copy of the HP Limited Warranty Statement, see the printed documentation that came with the product.
7 Connectivity Add the HP All-in-One to a network • • • WiFi Protected Setup (WPS) Traditional Wireless Connection USB Connection WiFi Protected Setup (WPS) To connect the HP All-in-One to a wireless network using WiFi Protected Setup (WPS), you will need the following: ❑ A wireless 802.11 network that includes a WPS-enabled wireless router or access point. ❑ A desktop computer or laptop with either wireless networking support, or a network interface card (NIC).
Chapter 7 ❑ Enter the PIN on WPS-enabled router or other networking device. ❑ Follow the on-screen instructions on the printer display. NOTE: The product begins a timer for approximately two minutes in which the PIN needs to be entered on the networking device. 2. View the animation for this topic. Traditional Wireless Connection To connect the HP All-in-One to an integrated wireless WLAN 802.11 network, you will need the following: ❑ A wireless 802.
Tips for setting up and using a networked printer Use the following tips to set up and use a networked printer: • • • • • When setting up the wireless networked printer, make sure your wireless router or access point is powered on. The printer searches for wireless routers, then lists the detected network names on the computer. If your computer is connected to a Virtual Private Network (VPN), you need to disconnect from the VPN before you can access any other device on your network.
Chapter 7 Connectivity 38 Connectivity
8 Solve a problem This section contains the following topics: Improve print quality Clear a paper jam Unable to print Networking HP support Solve a problem • • • • • Click here to go online for more information. Improve print quality 1. Make sure you are using genuine HP cartridges. 2. Check the print properties to make sure you have selected the appropriate paper type and print quality from the Media drop-down list.
Chapter 8 5. Print a diagnostics page if the cartridges are not low on ink. Solve a problem To print a diagnostics page a. Load letter or A4 unused plain white paper into the input tray. b. In the Printer Software, click Printer Actions and then click Maintenence Tasks to access the Printer Toolbox. c. Click Print Diagnostic Information to print a diagnostics page. Review the blue, magenta, yellow, and black boxes on the diagnostics page.
Clear a paper jam To clear a paper jam 1. Press the cancel button to try to clear the jam automatically. If this does not work, the paper jam will need to be cleared manually. 2. Locate the paper jam Input tray If the paper jam is located near the back input tray, pull the paper gently out of the input tray. Output tray • If the paper jam is located near the front output tray, pull the paper gently out of the output tray.
Chapter 8 Inside of printer • If the paper jam is located inside the printer, open the cleanout door located on the bottom of the printer. Press tabs on both sides of the cleanout door. Solve a problem • Remove jammed paper. • Close the cleanout door. Gently push the door towards the printer until both latches snap into place. 3. Press the OK selection button on the control panel to continue the current job.
Unable to print Make sure that the printer is turned on and that there is paper in the tray. If you are still unable to print, try the following in order: Solve a problem 1. Check for error messages and resolve. 2. Disconnect and reconnect the USB cable. 3. Verify that the product is not paused or offline. To verify that the product is not paused or offline NOTE: HP provides a Printer Diagnostic Utility that can automatically fix this issue. Click here to go online for more information.
Chapter 8 5. Restart the print spooler. To restart the print spooler NOTE: HP provides a Printer Diagnostic Utility that can automatically fix this issue. Solve a problem Click here to go online for more information. Otherwise, follow the steps below. a. Depending upon your operating system, do one of the following: Windows 7 • From the Windows Start menu, click Control Panel, System and Security, and then Administrative Tools. • Double-click Services.
6. Restart the computer. 7. Clear the print queue. NOTE: HP provides a Printer Diagnostic Utility that can automatically fix this issue. Click here to go online for more information. Otherwise, follow the steps below. a. Depending upon your operating system, do one of the following: • Windows 7: From the Windows Start menu, click Devices and Printers. • Windows Vista: From the Windows Start menu, click Control Panel, and then click Printers.
Chapter 8 lights are still blinking, then one or both cartridges may be defective. To determine if one cartridge is defective do the following: 1. Remove black cartridge. 2. Close cartridge door. 3. If the On light blinks, the tri-color cartridge should be replaced. If the On light does not blink, replace the black cartridge. Solve a problem Prepare the trays Open output tray ▲ Output tray must be open to begin printing. Close cartridge door ▲ Cartridge door must be closed to begin printing.
• • • • Learn how to find your network security settings. Click here to go online for more information. Learn about the Network Diagnostic Utility and other troubleshooting tips. Click here to go online for more information. Learn how to change from a USB to wireless connection. Click here to go online for more information. Learn how to work with your firewall and anti-virus programs during printer setup. Click here to go online for more information.
Chapter 8 • • Support phone numbers After the phone support period Phone support period Solve a problem One year of phone support is available in North America, Asia Pacific, and Latin America (including Mexico). To determine the duration of phone support in Europe, the Middle East, and Africa, go to www.hp.com/support. Standard phone company charges apply. Placing a call Call HP support while you are in front of the computer and the product.
Additional warranty options Solve a problem Extended service plans are available for the HP All-in-One at additional costs. Go to www.hp.com/support, select your country/region and language, then explore the services and warranty area for information about the extended service plans.
Chapter 8 Solve a problem 50 Solve a problem
9 Technical information The technical specifications and international regulatory information for the HP All-in-One are provided in this section. For additional specifications, see the printed documentation that came with the HP All-in-One. This section contains the following topics: • • • • Notice Specifications Environmental product stewardship program Regulatory notices Notice Hewlett-Packard Company notices The information contained in this document is subject to change without notice.
Chapter 9 Envelopes: Up to 5 Index cards: Up to 10 Photo paper sheets: Up to 10 Paper size For a complete list of supported media sizes, see the printer software.
Power specifications 0957-2286 • Input voltage: 100-240Vac (+/- 10%) • Input frequency: 50/60 Hz (+/- 3Hz) 0957-2290 • Input voltage: 200-240Vac (+/- 10%) • Input frequency: 50/60 Hz (+/- 3Hz) NOTE: Use only with the power adapter supplied by HP. Cartridge yield Visit www.hp.com/go/learnaboutsupplies for more information on estimated cartridge yields. Environmental product stewardship program Hewlett-Packard is committed to providing quality products in an environmentally sound manner.
Chapter 9 Paper use This product is suited for the use of recycled paper according to DIN 19309 and EN 12281:2002. Plastics Plastic parts over 25 grams are marked according to international standards that enhance the ability to identify plastics for recycling purposes at the end of product life. Material safety data sheets Material safety data sheets (MSDS) can be obtained from the HP Web site at: www.hp.
Dansk Bortskaffelse af affaldsudstyr for brugere i private husholdninger i EU Dette symbol på produktet eller på dets emballage indikerer, at produktet ikke må bortskaffes sammen med andet husholdningsaffald. I stedet er det dit ansvar at bortskaffe affaldsudstyr ved at aflevere det på dertil beregnede indsamlingssteder med henblik på genbrug af elektrisk og elektronisk affaldsudstyr.
Chapter 9 1907/2006 of the European Parliament and the Council). A chemical information report for this product can be found at: www.hp.com/go/reach. Toxic and hazardous substance table Technical information Regulatory notices The HP All-in-One meets product requirements from regulatory agencies in your country/region.
FCC statement FCC statement The United States Federal Communications Commission (in 47 CFR 15.105) has specified that the following notice be brought to the attention of users of this product. This equipment has been tested and found to comply with the limits for a Class B digital device, pursuant to Part 15 of the FCC Rules. These limits are designed to provide reasonable protection against harmful interference in a residential installation.
Chapter 9 Notice to users in Japan about the power cord Technical information 58 Technical information
HP Deskjet 3050 All-in-One series declaration of conformity DECLARATION OF CONFORMITY according to ISO/IEC 17050-1 and EN 17050-1 Supplier's Name: Supplier's Address: DoC #: VCVRA-1002-01 Hewlett-Packard Company SE 34th Street, Vancouver, WA 98683-8906, USA declares, that the product Product Name and Model: Regulatory Model Number: 1) Product Options: Radio Module: Power Adapters: HP Deskjet 3050 All-in-One printer J610 series VCVRA-1002 All SDGOB-0892 0957-2286 0957-2290 (China and India only) conform
Chapter 9 • • • Notice to users in Canada Notice to users in Taiwan European Union regulatory notice Exposure to radio frequency radiation Exposure to radio frequency radiation Caution The radiated output power of this device is far below the FCC radio frequency exposure limits. Nevertheless, the device shall be used in such a manner that the potential for human contact during normal operation is minimized.
European Union regulatory notice European Union Regulatory Notice Products bearing the CE marking comply with the following EU Directives: • • Low Voltage Directive 2006/95/EC EMC Directive 2004/108/EC CE compliance of this product is valid only if powered with the correct CE-marked AC adapter provided by HP.
Chapter 9 Technical information 62 Technical information
Index A T after the support period 48 copy specifications 52 customer support warranty 49 technical information copy specifications 52 environmental specifications 51 print specifications 52 scan specifications 52 system requirements 51 E W C environment Environmental product stewardship program 53 environmental specifications 51 warranty 49 I interface card 35, 36 N network interface card 35, 36 P Index paper recommended types 15 phone support 47 phone support period period for support 48 pri
Index 64