
Data Protector NDMP Integration Quickstart Guide

16
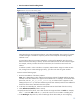
12. Click Finish to exit the wizard. You are prompted to configure a library drive. Click Yes and the
drive configuration wizard appears.
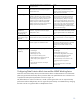
Note: Creating a tape drive configuration requires the same steps as for the library robotics except
that you have to perform the following actions:
Enter the correct drive index.
Assign the previously created NDMP media pool to every drive configuration you create.
Verify the correct tape block size.
Use “Lock Names” when appropriate.
The SCSI address follows the same convention as described for the library robotics.
When the device configuration is finished you must scan the library slots and format the tape media to
prepare the media pool for NDMP backups.
Creating an NDMP backup specification
Creating an NDMP backup specification in the Data Protector GUI follows a similar approach as for
regular file system backups using the “normal” Disk agent (DA), except for a few details.
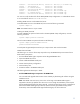
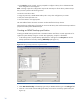
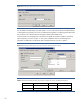
1. In the backup context, expand “Backup Specifications” and right-click on Filesystem to start the
backup specification wizard by selecting Add Backup (see Figure 12).
Figure 12: Adding a backup specification using the GUI wizard
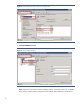
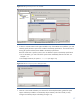
2. Select Data mover backup as the Backup type and your NDMP interface type in the Sub type field.
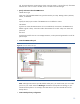
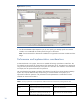
3. Continue in the wizard and start adding the backup source to the new backup specification (see
Figure 13).