Data Protector NDMP Integration Quickstart Guide How to set up HP Data Protector NDMP integration and HP StoreOnce Backup Systems to protect data stored in HP X9000 and NetApp FAS3070 NAS filers Technical white paper Table of contents Executive summary............................................................................................................................... 2 Audience ........................................................................................................................
Executive summary This white paper provides quick start information for integrating Data Protector with an HP X9000 Network Storage System or NetApp FAS3070 Universal Storage System, for NDMP (Network Data Management Protocol) based backup tasks where the backup target is an HP StoreOnce Backup System. Key take-away points: When using HP Data Protector for direct NDMP backups of HP X9000 and NetApp filers, the HP StoreOnce Backup System can be used as a deduplicating disk backup target.
NAS concept Network-attached storage (NAS) is file-level computer data storage connected to a computer network providing data access to heterogeneous network clients. Although it may technically be possible to run other software on a NAS unit, it is not designed to be a general purpose server. For example, NAS units usually do not have a keyboard or display, and are controlled and configured over the network, often using a browser.
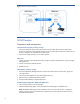
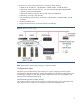
Figure 1: NDMP 2-way backup architecture NDMP backup Preparation and prerequisites StoreOnce Backup System (secondary storage) 1. Set up the StoreOnce system and create at least one virtual tape library with the appropriate number of tape drives. Select the desired tape emulation and number of tape slots. Make sure the library is mapped to an available Fibre Channel port. 2. Connect the configured library to your SAN segment. SAN router 1.
3. Ensure that you have correct Data Protector licensing for NDMP backups: NDMP LTU for all platforms: 1xTB B7022BA, 10xTB B7022DA, 100xTB TD186AA Appropriate number of library slots LTU: 1x 61-250/unlimited slots B6957BA/B6958BA, upgrade to unlimited slots B6958CA Appropriate number of tape drive LTU for SAN, UNIX, NAS: B6953AA Alternatively, licensing to tape drive LTU Advanced Backup to Disk LTU for all platforms: 1xTB B7038AA, 10xTB B7038BA, 100xTB B7038CA 4. Configure the NDMP client. 5.
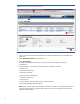
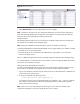
Figure 3: StoreOnce Backup System Administration GUI 1. Log on to the StoreOnce web administration GUI. Enter the administrator user credentials and password. 2. Select Virtual Tape Devices from the menu list. 3. Select Create Library. This alters the lower part of the screen, allowing you to make changes to the library characteristics. 4. Change the library characteristics according to your needs.
5. Click Create in order to create the virtual tape library according to your specification.The creation of the virtual library will make the new library appear on the StoreOnce management GUI. 6.
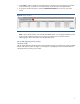
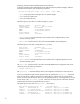
Figure 5: HP X9000 Network Storage Gateway Administration GUI 1. Log on to the HP X9000 web management GUI. Enter the administrator user credentials and password. 2. Select Cluster Configuration in the navigator list. 3. Select NDMP Backup in the Cluster Configuration. 4. Click Modify and make the necessary changes in the web form that appears.
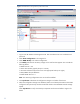
Figure 6: Discover Tape Devices 7. Select Rescan Devices if the newly attached devices do not appear. Note: “Hostname” and “Device ID” are configuration details that are used in further configuration tasks within the DMA (NDMP client) configuration. Each segment server (Hostname) of the X9000 cluster may discover the attached backup devices (Device ID).
Displaying information about attached tape drives and libraries To display information about attached tape drives and tape libraries (medium changers), and their associated serial numbers, enter the following command: tpc008> storage show {tape | mc} [{alias | PPN | WWN}] – alias is the logical name of the tape drive or medium changer. – PPN is the physical path name. – WWN is the worldwide name.
urst41m rst41h nrst41h urst41h rst41a nrst41a urst41a - unload/reload device, rewind device, no rewind device, unload/reload device, rewind device, no rewind device, unload/reload device, format format format format format format format is: is: is: is: is: is: is: LTO-2(ro)/3 4/800GB cmp LTO-4 800GB LTO-4 800GB LTO-4 800GB LTO-4 1600GB cmp LTO-4 1600GB cmp LTO-4 1600GB cmp You can now verify the device file for the DMA (NDMP client) configuration.
Figure 7: Push the NDMP Media Agent component to the NDMP client 2. Import the NDMP host/server. Figure 8: Import the NDMP host/server Note: Importing a client means manually adding a computer to a Data Protector cell. On NDMP hosts/servers, no Data Protector component will be installed.
cell, the system becomes a Data Protector client. Once the system is a client of the cell, information about the new client is written to the IDB, which is located on the Cell Manager. 3. Specify information about the NDMP Server. NDMP Server Type Select one of the available NDMP host types that matches your setup: NetApp, Celerra, BlueArc, Hitachi, or HPX9000. Port Specify the TCP/IP port number of the NDMP Server. The default is 10000.
Figure 10: Create a Backup Library configuration Once the device has been connected and configured on the NDMP host, the device can be configured with Data Protector. The library robotics and tape drives require the following common configuration items: In the Device Name text box, enter the unique name of the device. In the Description text box, enter a description (optional). In the Device Type list, select the SCSI Library device type.
6. Enter the SCSI and media handling details. Figure 11: Enter SCSI and media handling details SCSI library devices are large backup devices, also called autoloaders. They consist of a number of media cartridges in the device‟s repository and can have multiple drives handling multiple media at a time. A typical library device has a SCSI ID (Windows) or a device file (UNIX) for each drive in the device and one for the library‟s robotics, which moves media from slots to drives and back again.
12. Click Finish to exit the wizard. You are prompted to configure a library drive. Click Yes and the drive configuration wizard appears. Note: Creating a tape drive configuration requires the same steps as for the library robotics except that you have to perform the following actions: Enter the correct drive index. Assign the previously created NDMP media pool to every drive configuration you create. Verify the correct tape block size. Use “Lock Names” when appropriate.
Figure 13: Adding the backup source for an HP X9000 4. As there is no Data Protector Disk Agent installed on any of the NDMP server platforms, you must manually specify the mount point to be included in the backup specification. You cannot browse existing file systems and have them added to the backup specification. Each filer vendor has a specific syntax on how to add mount points to the backup specification: For an HP X9000, you must enter the file system name immediately after the root slash.
Figure 15: Backup summary 6. On Advanced NDMP Object Properties you can now specify your backup specific environment variable, such as EXCLUDE to exclude specific file types or directories. Note: Consult the NAS filer administrator handbook for supported environment variables and their usage. Performance and implementation considerations As described earlier in this paper, there are two methods of backing up the data on NAS filers.
StoreOnce Backup System is connected using the data network. System. Backup flexibility It is a simple process to include and exclude files and directories for backup through the Data Protector GUI. Standard dump format enables control over what is backed up via file and directory exclusion policies implemented using vendorspecific environment variables.
Figure 16: Specifying the Data Protector block size used to write the backup to a virtual tape drive. For an NDMP-controlled backup, the data stream is not in a Data Protector format. The default format is dump (others are possible), which can use different blocking factors. The blocking factor determines the size of the units of backup data moved and processed by the NDMP Server.
Deduplication performance test results As part of the validation of Data Protector managed protection of HP and NetApp NAS filers using a HP StoreOnce Backup System as the backup storage, the backup data deduplication rates were measured. The test data set was made up of unstructured file data from a production environment. A backup scheme that simulated daily full backups was used. Between each backup, a random selection of 5% of the data was changed.
Conclusions The main benefits of NDMP direct backups are delivered when: – There is a need to minimize the backup load on the data network, application servers and backup media servers. – The filer is required to be backed up as a complete entity, although you can exclude files using exclude commands in the NDMP environmental variables set in the NDMP backup job.
For more information To read more about: HP Data Protector software, go to www.hp.com/go/dataprotector HP X9000 Network Storage System, go to www.hp.com/go/x9000 HP StoreOnce Backup System, go to www.hp.com/go/d2d HP Data Deduplication, go to www.hp.com/go/storeonce © Copyright 2011 Hewlett-Packard Development Company, L.P. The information contained herein is subject to change without notice.