
TRIM Integration with Data Protector

15
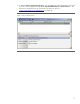
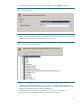
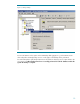
5. Select the appropriate client and the application database and click Next. See Figure 13.
Figure 13: Choosing the database
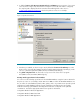
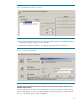
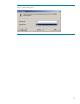
6. In the Source property page, expand the system that contains the objects that you want to back up
and the select the sources you want backed up. See Figure 14.
Figure 14: Adding backup specification: select sources
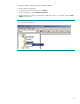
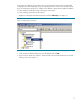
7. In addition to the Metadata Database itself (here “Corp”) it is highly advisable to back up the
system databases up as well. For further considerations concerning the system databases see the
Data Protector Integration Guide for Microsoft Applications.
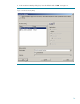
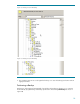
8. In the Destination property page, select the device you will use for your backup. See
9. Figure 15. Devices should have already been set up as described above.