
HP Data Protector 6.1 software VMware Integration Installation Best Practice


15
7. Unmount the DVD:
# cd /
# umount /mnt/cdrom1
8. Check the installation. See step 6 of B1: Using a local DVD drive.
9. Firewall configuration. See step 2 of B1: Using a local DVD drive.
10.Import the ESX server as client to the Cell Manager. See step 8 of B1: Using a local DVD
drive.
D2: Remote ISO-image
HP’s iLO and iLO2 not only allow you to connect a DVD drive from the local PC, you can also
mount a directory that holds an ISO image. This directory need not be a directory on the PC, it
could be a mapped network drive. This means the installation runs directly from a foreign ISO-
store onto the ESX server. There is no need to copy any data first. Note that the network can slow
down the installation process.
The procedure is similar to D1: Remote DVD, but instead of a local Media Drive, select a local
ISO image file. There are two possible sources: an ISO image created from the DVD B6960-
15001, and the ISO image B6960-15003.iso which you can download from the web. See
Appendix A: “DVDs and downloadable bits”.
With iLO:
Click “Connect”.
If the connection works properly, the drive logo becomes green.
The mount and installations steps are similar to D1: LOCAL DVD
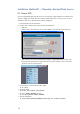
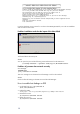
With iLO2 using the “Integrated Remote Console” you can mount an ISO image directly from a
directory. The following screen shows the top right corner of the Console window. Click on the
drive symbol to open the selection menu. For example, click Mount next to a folder symbol to
browse the local system and select an ISO image.