
HP Data Protector 6.1 software VMware Integration Installation Best Practice


10
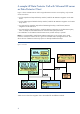
Installation Method B – Media directly attached to the
ESX server
B1: Using a local DVD Drive
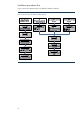
Prepare the ESX Server to get access
1. You can access the ESX server either through the console or through remote access tools (such
as Putty or ReflectionX). These remote access tools are based on the SSH protocol.
By default SSH is blocked by the ESX server. To enable the login on the ESX server with SSH,
see Appendix A: “Enable SSH-login on ESX Server”.
2. Firewall configuration.
For Data Protector, the port 5555 needs to be open. By default, the firewall on the ESX server
blocks the port. To open it, execute the following command:
# esxcfg-firewall –-openPort 5555,tcp,in,HP-DataProtector
See Appendix A: “Firewall settings” for more information.
3. Insert and mount the DVD: HP-UX B6960-15001.
If the directory /mnt/cdrom does not exist, create it with the command:
# mkdir /mnt/cdrom
Then mount the drive:
# mount –t auto /dev/cdrom /mnt/cdrom
You can identify the DVD Drive by checking the directory listing of /dev:
# ls -l /dev
4. Go to the Local Install directory on the DVD drive:
# cd /mnt/cdrom/LOCAL_INSTALL
5. Start the installation:
# /mnt/cdrom/LOCAL_INSTALL/ommnisetup.sh –install vmware
6. Check the installation:
# rpm –qa | grep –i OB2
OB2-CORE-A.06.10-1
OB2-VMW-A.06.10-1
7. Umount the cdrom:
# cd /
# umount /mnt/cdrom
8. Import the ESX server as client to the Cell Manager:
Open the Data Protector GUI, go to the context menu, right-click on clients, select import
client....
Note: If the port 5555 on the firewall is already open, you can combine the import step (8) with
the installation step (5). Additionally the DA and the MA are installed:
# /mnt/cdrom/LOCAL_INSTALL/ommnisetup.sh –server cellmanager.domain.com
–install da,ma,vmware
where cellmanager.domain.com is the name of the Cell Manager.