HP Data Protector A.06.11 Support for VMware vStorage First published October, 2010. Latest version, V6, May 2011 Technical white paper Table of contents Summary ............................................................................................................................................ 3 Introduction ......................................................................................................................................... 4 Backup concepts......................................
Troubleshooting ................................................................................................................................. 61 Before you begin ........................................................................................................................... 61 Problems ....................................................................................................................................... 61 Appendix A Command descriptions .......................................
Summary This white paper describes the Data Protector VMware vStorage integration, which enables you to back up and restore VMware virtual machines using the VMware vStorage technology.
Introduction This integration is an addition to the already existing Data Protector VMware Virtual Infrastructure integration. It is based upon the VMware vStorage backup technology and does not require backup proxy systems with the VCB software installed. Note that when you back up virtual machines using the Data Protector VMware vStorage integration, the virtual machine files are not copied to the backup host, as is done in a VCBimage backup session (in which the files are copied to the backup proxy).
Backup concepts Operational method Data Protector VMware vStorage integration provides the following new backup method: vStorage Image This method can be used to back up and restore the following VMware objects: Virtual machines Virtual machine disks Virtual machine templates This is a snapshot-based backup method that can be used to backup virtual machines while powered off (offline backup) or actively used (online backup).
Data Protector Virtual Environment Integration component Under most circumstances, it is only necessary to install the Data Protector Virtual Environment Integration component on one Data Protector client in the cell in which the virtual environments to be backed up are located. This client will be called the backup host and can be: The Data Protector Cell Manager A dedicated physical backup host A virtual machine The component includes the following major parts: vepa_bar.
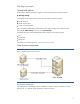
Figure 2: vCenter environment ESX Server or ESXi Server system VMware platform capable of hosting multiple virtual machines. VM Virtual machine. Virtualized x86 or x64 PC environment, in which a guest operating system and associated application software can run. Datacenter An organizational unit that consists of one or more ESX Server and/or ESXi Server systems and the related storage for virtual machines (datastores). Datastores can reside on local disks/RAID, iSCSI or SAN storage.
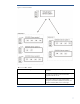
Migration of virtual machines In a vCenter environment, Data Protector supports migration (usingVMotion and Storage VMotion) of virtual machines between ESX Server and/or ESXi Server systems in the same datacenter and, for supporting versions of VMware infrastructure, in different datacenters.
Figure 3: Migration of virtual machines Whatever the reason for the migration, you do not need to create a new backup specification afterwards. Data Protector will automatically find the migrated virtual machines and back them up. Note, however that if you select an ESX(i) Server system as a VMware management client, Data Protector will not be able to find the migrated virtual machine.
vCenter Server system in a cluster Data Protector also supports environments with a vCenter Server system in a Microsoft Cluster Service cluster. After a failover in such a cluster, you do not need to change the backup specification. However, if the failover occurs during a backup or restore session, the session fails and has to be restarted. Standalone ESX/ESXi Server environment In a standalone ESX/ESXi Server environment, Data Protector communicates with vSphere through the backup host.
Restore concepts You can restore virtual machines, virtual machine disks, and virtual machine templates from backups performed using the Data Protector vStorage method. Restore of virtual machines Virtual machines backed up with the vStorage Image method can be restored in two ways: To a datacenter To a directory Restore to a datacenter When restoring to a datacenter, the normal (and default) situation is to restore virtual machines to their original ESX/ESXi server or vCenter.
Restore considerations Restore chain: When you restore a virtual machine from an incremental or differential session, Data Protector automatically restores the complete backup chain, starting with the last full backup, which is then followed by the last differential and all subsequent incremental backups (if they exist) up to the selected session. Concurrent sessions: Restore sessions that use the same devices or restore to the same datacenter cannot run concurrently.
Data Protector backup types The following Data Protector backup types are available for VMware with this integration: Full. This is a standard Data Protector full backup to disk and/or tape. Incremental. This backs up the changes since the last backup of any type; full, incremental or differential. Differential. This backs up the changes since the last full backup. It is equivalent to the Incremental 1 backup type available in some other Data Protector integrations.
vStorage Image backup method For the vStorage Image backup method provided by the Data Protector VMware vStorage integration, a single central backup host can be used to back up all virtual machines hosted by vCenter or ESX/ESXi servers in a Data Protector cell. This backup host can be the Cell Manager or any other dedicated host, or virtual machine. The important thing is that it has the Data Protector Virtual Environment Integration component installed.
Figure 5: vStorage Image method Snapshot management vStorage backup methods rely on the ability to create virtual machine snapshots in order to put a virtual machine into a consistent state. Subsequent changes made to the virtual machine disks are then recorded to separate files. Note that the snapshot operation is not supported by all virtual machine disks. For details, see the VMware documentation.
During a vStorage backup, Data Protector first creates a snapshot and then copies data from the consistent state to Data Protector media. Snapshots created for Data Protector purposes (DP snapshots) are distinguished from other snapshots by the label _DP_VEPA_SNAP_ and a description that contains the product name and a timestamp. Therefore, avoid using this label for snapshots that you create for other purposes.
Full, incremental, incremental, incremental,... You cannot mix incremental and differential backups within the same backup chain. The snapshot made at the beginning of a backup session is used to create a consistent state. After the backup completes, one DP snapshot remains on the snapshot tree. It is needed to track changes made since the last full or incremental backup. For details, see Snapshot mode: single. Mixed: Supports full, differential, and incremental backups in all backup chain combinations.
Table 1 vStorage backup method overview vStorage method options selected How is backup consistency achieved? Supported guest operating system Supported backup types Full Diff Incr None (Standard operation) Data Protector requests a virtual machine snapshot, providing crash consistency.
Snapshot mode: disabled A full backup in Disabled mode progresses as shown in the following figure. Figure 7: Full backup (disabled mode) Legend Ti Boxes denoted by Ti show how the virtual machine snapshot tree changes in time. Virtual machine base The rectangle denoted by Virtual machine base represents the virtual machine base or the last nonData Protector created virtual machine delta file on the active branch.
Snapshot mode: single A full backup in the Single mode progresses in the same way as a full backup in the Disabled mode, with the exception that the DP snapshot is not removed at the end (you end up with one DP snapshot). A subsequent differential backup is shown in the following figure.
Figure 8: Differential backup (single mode) DP snapshot1 remains on the snapshot tree to track changes made since the last full backup. A backup chain consisting of a full backup that is followed by incremental sessions progresses in the same way, with the exception that, at the end of an incremental session, DP snapshot1 is removed instead of DP Snapshot2 (see Figure 9 Incremental backup (single mode)).
Figure 9: Incremental backup (single mode) DP snapshot2 remains on the snapshot tree to track changes made since the last incremental backup.
Snapshot mode: mixed A full backup in the Mixed mode progresses in the same way as a full backup in the Single mode (you end up with one DP snapshot). A subsequent differential or incremental backup progresses in the same way as a differential or incremental backup in the Single mode, with the exception that no DP snapshot is removed at the end (you end up with two DP snapshots). The progress of a subsequent incremental backup is shown below.
Figure 10: Incremental backup (mixed mode) 24
DP snapshot1 and DP snapshot3 remain on the snapshot tree to track changes made since the last full and the last backup respectively. A subsequent differential backup progresses in the same way as an incremental session described in Figure 10 Incremental backup (mixed mode) with the following exceptions: DP snapshot2 is removed before DP snapshot3 is created. Instead of changes made between DP snapshot2 and DP snapshot3, changes made between DP snapshot1 and DP snapshot3 are backed up.
Table 5 Disk space requirements Backup method Required disk space on datastores Explanation vStorage Image A specified percentage of the sum of all virtual machine disk sizes, plus: After a snapshot is created, changes made to the virtual machine disks are recorded to separate files (one delta file is created for each virtual machine disk). A delta file can grow up to the total size of the virtual machine disk. Keep this in mind when specifying Free space required.
Limitations The Data Protector Java GUI is not supported.
Installation Prerequisites Ensure you have HP Data Protector A.06.11 installed, with the following: A supported Cell Manager. A supported Windows user interface client. A supported Windows Installation Server. A supported Windows system available for use as a backup host. For details on supported systems, refer to the support matrix. The VMware virtual environment to be backed up must be at vSphere 4.0 or 4.1.
Linux system: DPLNX_00146 HP-UX (PA-RISC): PHSS_41875 HP-UX (Itanium): PHSS_41876 Note If you have a non-Windows Cell Manager, upgrade the Cell Manager after you have installed the Core and Cell Manager patches on it. 3. GUI patch: Install the GUI patch on your Installation Server: Windows system: DPWIN_00493 4.
Notes The client that you intend to use as a backup host should not have the VMware Consolidated Backup (VCB) software installed. If you already have an older version of the Virtual Environment Integration component installed in your environment, upgrade the component on all backup hosts. For details, see Upgrading the Virtual Environment Integration component. Installing the Virtual Environment Integration component 1. Connect to any client with the updated Data Protector User Interface component. 2.
Figure13: Session completed successfully The Virtual Environment Integration component is installed. Note The Virtual Environment Integration and VMware (Legacy) Integration components can coexist, with a limitation that a backup host should not have the VMware Consolidated Backup (VCB) software installed. After installing the Virtual Environment Integration component, the Backup context displays a new icon called Virtual Environment, as shown below.
Figure 14: After the upgrade, a new icon is created and the old backup specifications are transferred under the new icon. Upgrading the Virtual Environment Integration component 1. In the Context List, click Clients. 2. In the Scoping Pane, expand Data Protector Cell, expand Clients, right-click a backup host and click Upgrade. 3. Select the backup host and click Finish.
Importing VMware clients into the Data Protector cell With the Data Protector VMware vStorage integration, it is not necessary to install any Data Protector components on VMware clients (vCenter Server systems, ESX(i) Server systems), but to make them Data Protector clients, they must be imported into the Data Protector cell.
Figure 15: Importing a client 4. In the configuration panel, specify the following: Port: Specify the port that VMware (vCenter Server, vSphere) is using. By default, VMware uses the port 443.
Resource -> Remove resource pool Resource -> Rename resource pool Sessions -> Validate session vApp -> Delete vApp -> Rename vApp -> Add virtual machine Virtual machine -> State -> Revert to snapshot Virtual machine -> Configuration * Virtual machine -> Interaction -> Answer question Virtual machine -> Interaction -> Power Off Virtual machine -> Interaction -> Power On Virtual machine -> Inventory -> Create new Virtual machine -> Inventory -> Register Virtual machine -> Inventory -> Remove Virtual machine -
Figure 16: Configuring a vCenter Server system Click Finish. Note To change or check the parameters later, open any backup specification for this VMware management client, go to the Source page, right-click the client at the top, and click Configure. The configuration of a client is also checked when you select the client when setting up a backup specification. If the check fails, the dialog box appears for you to enter the correct parameters.
Configuring the integration Configure the integration as follows: Configure users as described in Configuring VMware users. Provide Data Protector with login information to VMware management clients as described in Configuring VMware management clients. For each virtual machine, specify details on how to perform various backup methods as described in Configuring virtual machines. Prerequisites Ensure that you have a correctly installed and configured the VMware environment.
Alternatively, you can instruct Data Protector to use Integrated security, in which case Data Protector takes the user account under which the Data Protector Inet service on the Cell Manager is running. Integrated security is based on Security Support Provider Interface (SSPI). Note that the port and web root are still taken from the cell_info file. You can specify Standard security or Integrated security using the Data Protector GUI or CLI.
You can configure each virtual machine separately or altogether. Configuration settings for virtual machines of the same datacenter are saved in a separate configuration file on the Cell Manager. The file is named VMwareManagementClient%DatacenterPath. It is used for all backup sessions involving this particular datacenter. To configure virtual machines, use the Data Protector GUI or CLI.
Table 7 Virtual machine configuration Configure virtual machine Select whether you want to specify common virtual machine settings (Common VM Settings) or settings for a specific virtual machine. Virtual machine specific settings override the common virtual machine settings. Use common settings for selected VM Available only if a virtual machine is selected. Select this option to apply the common virtual machine settings for the selected virtual machine.
Figure 18: Configure virtual machines (Advanced) 3. In the Virtual machine configuration dialog box Advanced tab, specify the following settings: Table 8 Advanced virtual machine settings Select any advanced backup features you want to use for the virtual machine(s). Optimize Disks Select this to shrink the virtual machine disk(s) before the backup process.
snapshot fails. Transportation mode Select the transportation mode to be used for backing up the virtual machine. The following modes are available: LAN: Use this mode when your ESX(i) Server systems do not have access to a SAN, but use local storage devices or NAS to store virtual machine disks. This is an unencrypted transportation mode over a local area network that uses the Network Block Device (NBD) driver protocol. This transportation mode is usually slower than Fibre Channel.
Using the Data Protector CLI 1. Log in to the backup host, open the command-line interface, and change to the following directory: Data_Protector_home\bin 2. Run: vepa_util.
vepa_util.exe command --check-conf --virtual-environment VMware --host VMwareManagementClient For option descriptions, see the vepa_util.exe description at the end of this document.
Backup Using the Data Protector VMware vStorage integration, you can back up the following VMware objects: Virtual machines Virtual machine disks Virtual machine templates What is backed up? Data Protector identifies datacenters and virtual machines by their Virtual Infrastructure inventory path. A standalone ESX/ESXi Server system has only one datacenter /ha-datacenter and only one folder /vm, which stores all the virtual machines.
2. In the Scoping Pane, expand Backup Specifications, right-click Virtual Environment, and click Add Backup. 3. In the Create New Backup dialog box, select Blank Virtual Environment Template and click OK. 4. Specify the application to be backed up: In Client, select a VMware client. Note that the Client drop-down list offers all clients that have been imported into Data Protector as a VMware vCenter, or VMware ESX(i) client.
Figure 19: Selecting a client Click Next. 5. Select the virtual machines, individual virtual machine disks or virtual machine templates that you want to back up. You can back up the following VMware object: Virtual machines Virtual machine disks Virtual machine templates However, you can make your selections at different levels: ESX/ESXi servers Pools vApps VM folders Individual VMs VM disks VM templates Note that we do not support backup of the vApps configuration itself.
machine is added within the item between a full and incremental/differential backup, each VM will be treated separately and the added VM will receive a full backup. Figure 20: Selecting VMware objects If your virtual machines are not configured yet, right-click the client system at the top or any of the virtual machines listed below, and click Configure Virtual Machines. For details, see Configuring virtual machines. Click Next. 6. Select devices to use for the backup.
Figure 21: Application specific options Click Next. 8. Optionally, schedule the backup. See Scheduling backup specifications. Click Next. 9. Save the backup specification, specifying a name and a backup specification group. Tip Preview your backup specification before using it for a real backup. See Previewing backup sessions.
Table 9 VMware backup options Options Description Pre-exec, Post-exec The command specified here is run by vepa_bar.exe on the backup host before the backup (pre-exec) or after it (post-exec). Do not use double quotes. Type only the name of the command and ensure that the command resides in the following directory on the backup host: Data_Protector_home\bin Backup memory file If this option is selected, the memory of a running virtual machine is saved into a file and backed up.
Figure 22: Scheduling a backup specification Previewing backup sessions Preview the backup session to test it. You can use the Data Protector GUI or CLI. Using the Data Protector GUI 1. In the Context List, click Backup. 2. In the Scoping Pane, expand Backup Specifications and then Virtual Environment. Right-click the backup specification you want to preview and click Preview Backup. 3. Specify the Backup type and Network load. Click OK.
Whether devices are correctly specified Whether the necessary media are in the devices Starting backup sessions Interactive backups are run on demand. They are useful for urgent backups or restarting failed backups. To start a backup interactively, use the Data Protector GUI or CLI. Using the Data Protector GUI 1. In the Context List, click Backup. 2. In the Scoping Pane, expand Backup Specifications, and then Virtual Environment.
Restore You can restore virtual machines using the Data Protector GUI or CLI. Virtual machines backed up with the vStorage Image method can be restored in two ways: To a datacenter To a directory Restore to a datacenter By default, virtual machines are restored to the original datacenter, but you can select a different datacenter if you want.
Note If the virtual machine *.vmx file is not restored (and an *.xml file is restored instead), you cannot recover the virtual machine using the procedure described in the HP Data Protector integration guide for VMware Virtual Infrastructure, Sybase, Network Node Manager, and Network Data Management Protocol Server. In such a case, create a new virtual machine, upload the restored virtual machine disks to the datastore, and add the disks to the newly-created virtual machine.
Figure 23: Backup object information Tip To view the messages displayed during the session, click the Messages tab. Using the Data Protector CLI 1. Log in to a Data Protector client with the Data Protector User Interface component installed. 2. Open the command-line interface and change to the following directory: Data_Protector_home\bin 3. To get a list of VMware backup objects created in a particular backup session, enter: omnidb -session SessionID 4.
Restoring using the Data Protector GUI 1. In the Context List, click Restore. 2. In the Scoping Pane, expand Virtual Environment, expand the relevant client and click the datacenter with virtual machines to be restored. 3. In the Source page, Data Protector displays VMware objects that were backed up with the VMware vStorage method. By using the From and To options, you can narrow the scope of displayed virtual machines to those backed up within the specified time interval.
Figure 24: Selecting VMware objects for restore (vStorage Image) 4. In the Options page, specify the restore options. For details, see Table 10 Restore options.
Figure 25: Restore options (vStorage Image) 5. In the Devices page, select devices to use for restore. 6. Click Restore. 7. In the Start Restore Session dialog box, click Next. 8. Specify Report level and Network load. Click Finish to start the restore. The message Session completed successfully is displayed at the end of a successful session.
Backup host/ Specifies the client with the Data Protector Virtual Environment Integration component installed that will act as the backup host to control the restore session. By default, the same client as used for the backup will be used for the restore. [-barhost] [-destination] Specifies the destination VMware management client. If you select an ESX(i) Server system, virtual machines are registered in and restored to this system.
Options for Restore to directory File conflict handling Specifies Data Protector’s behavior if files to be restored already exist in the destination. Note that if you select Restore to directory, the restore is effectively a filesystem restore and the following options apply rather than the Virtual machine handling options. Overwrite (default) [-overwrite] Skip [-skip] Keep latest [-latest] Data Protector always overwrites existing files with those from the backup.
Troubleshooting This section lists problems you might encounter when using the Data Protector VMware vStorage integration. For general Data Protector troubleshooting information, see the HP Data Protector troubleshooting guide. Before you begin Ensure that the latest official Data Protector patches are installed. See the online Help index: “patches” on how to verify this.
Action When you specify the Datacenter option, select a specific datacenter and not All datacenters to reduce the query time. Problem A backup session is not performed as specified in the backup specification When you start a backup session, the backup is performed, but the options specified in the backup specification are ignored – the default settings are used. This may happen if virtual machines have migrated to different ESX(i) Server systems.
context (Storage appliance page) of the Data Protector GUI, new values are not saved to the cell_info file - the credentials are not updated. The same problem occurs when you create a new backup specification; the credentials that you specify in the Configure Virtual Environment dialog box are not saved to the cell_info file. As a result, when you need to update a user’s password, backup sessions start to fail. This problem occurs only if you have a non-Cell Manager backup host.
Deleted directory C:\WINDOWS\TEMP\vmware-SYSTEM\4228161a-6adf-bbdfa4e9-8e8dafcede98-vm-4313\nbdssl [Normal] From: OB2BAR_VEAgent@backuphost.company.com "/DATACENTER_CLUSTER_AMD" Time: 3/3/2011 2:43:47 PM Virtual Machine g32: Removing snapshot ... The reason for the failure is that, on ESX Server 4.1.
Appendix A Command descriptions The following CLI commands are added /updated on an updated user interface client: Addition to omnib Usage: omnib –veagent_list ListName [-barmode VirtualEnvironmentMode] [List options] VirtualEnvironmentMode { full | diff | incr } -barmode VirtualEnvironmentMode Specifies a full, differential or incremental backup. If the option is not specified, a full backup is performed.
-apphost OriginalVMwareManagementClient Specifies the original VMware management client. -instance OriginalDatacenter Specifies the original datacenter. -session SessionID Specifies from which backup to restore. If this option is not specified, the last backup is used. -vm VMPath Specifies the virtual machine path. For example, /vm/myTestVM. -disk DiskName Specifies a virtual machine’s disk to be restored. If the option is not specified, the complete virtual machine is restored.
[-overwrite | -skip | -latest] -overwrite Overwrites a preexisting file. -skip Skip the restore of a preexisting file. -latest Overwrites a preexisting file if it is older the one from the backup. Addition to omnidb The option –vepa is added. For details, see the HP Data Protector command line interface reference. Addition to omniobjcopy Usage: omniobjcopy –veagent Host:Set -session SessionID For details, see the HP Data Protector command line interface reference.
connection. --webroot arg (=/sdk) webroot for the SDK (e.g. /sdk). --security-model arg Standard security: 0 Integrated security: 1 COMMAND_OPTIONS --set-esx-maintenance-mode Enters/exits maintenance mode for specified ESX(i) Server system(s). --esx-server arg Specifies ESX Server systems(s) to enter/exit maintenance mode. Checks whether the ESX(i)Server system is configured right. --check-config --config Configures the ESX(i) Server system.
QUERY_OPTIONS --list-object-names Lists all object names. --list-esx-servers Lists all ESX Server systems. --list-datacenters Lists all datacenters. --list-datastores Lists all datastores. --list-restore-devices Lists all devices needed for restor.e --input arg Specifies an input string. BROWSE_OPTIONS --root-node arg Specifies a root node to start the browsing on. --debug arg { <[postfix]> <[select]> } Examples 1. To configure the vCenter Server system vc.company.
For more information Visit the following Data Protector online resources to get more information: www.hp.com/go/dataprotector www.hp.com/go/imhub/dataprotector Share with colleagues © Copyright 2011 Hewlett-Packard Development Company, L.P. The information contained herein is subject to change without notice. The only warranties for HP products and services are set forth in the express warranty statements accompanying such products and services.