
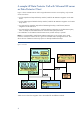
HP Data Protector 6.1 software VMware Integration Installation Best Practice


8
See Troubleshooting “Man-in-the-middle attack” on page 17.
– Error message: scp: .ssh/: Is a directory
The scp command fails because there is no .ssh directory on the ESX server.
Solution:
On the ESX server, login with root.
Create a directory:
# mkdir .ssh
Apply the correct setting to the .ssh directory:
# chmod 600 .ssh
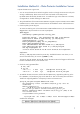
6. Append the key manually:
#cat id_rsa.pub >> authorized_keys
(The file authorized_keys will be created if it is not already available.)
7. Make a simple test to check that the SSH connection is working. From the Data Protector
Installation Server, ask the ESX server via the SSH connection for the date and time:
# ssh esx.domain.com date
Thu Apr 21 17:56:33 CET 2009
Note: The remote system must not ask for a passphrase or the Data Protector installation will
fail.
8. Firewall configuration.
By default, the firewall from the ESX server blocks the port 5555. To open this port, perform
the following command:
# esxcfg-firewall –-openPort 5555,tcp,in,HP-DataProtector
See Appendix A: “Firewall settings” for additional information.
9. Set the omnirc variable OB2_SSH_ENABLED.
Before the installation can start, set the omnirc variable OB2_SSH_ENABLED on the Installation
Server to “1”.
Extract from the omnirc file:
#
OB2_SSH_ENABLED=1
# Default: 0
# Allows SSH protocol to be used for remote installation of DP agents. This
# secures the remote connections while distributing the agents. Set this variable
# on Installation Server host. This is applicable only on UNIX platforms
You can find the .omnirc file on HP-UX, Linux and Solaris at: /opt/omni/.omnirc. If there is
no .omnirc file, copy the file .omnirc.TMPL to .omnirc.
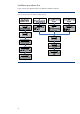
10.Open the Data Protector GUI:
Go to the Client context and right-click “Add client”: