
Data Protector Cluster Cell Manager Configuration and Integration on RHCS

6
Run the xomni command to check the DP GUI can be opened without any issue on the current
node
:
$/opt/omni/bin/xomni &
4. Stop the Data Protector services on the secondary node, unmount the shared disk on it, and
mount it on the primary node by repeating the above step on the primary node
.
Note: Create cluster resources using the cluster configuration tool (see the next section).
$system-config-cluster
5. Import the virtual server client on to the Cell Manager.
$/opt/omni/bin/omnicc -import_host dpi00180.ipr.com –virtual
Now the Virtual Server acts as Cell Manager, as the following command shows:
$/opt/omni/sbin/omnidbutil –show_cell_name
Catalog database owner: "dpi00180.ipr.com"
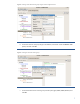
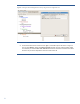
Creating the Data Protector Cluster resources
1. Log on to the Cluster Manager page using the following command:
$system-config-cluster
2. Create the Virtual Server IP group, Shared Disk group, and DP service group followed by DP
Services
.
a. Enter the GFS resource name, mount point, and device. Selects “Force Unmount”, and then
click OK
.