
Chassis Install Instructions (734751-001, March 2014)


NOTE: Rails are marked L and R with an arrow indicating the direction in which the rail
should be installed.
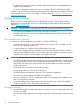
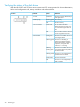
2. Use guide pins to align the shelf mount kit to the RETMA column holes.
3. To engage the rear, push the rail toward the back of the rack until the spring hook (1) snaps
into place.
4. To engage the front, pull the rail towards the front of the rack to engage the spring hook with
the RETMA column in the same manner as the rear spring hook.
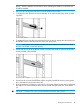
NOTE: Make sure that the respective guide pins for the square or round hole rack align
properly into RETMA column hole spacing.
5. Secure rear of rack rail to the RETMA column with either the round- or square-hole shoulder
screws provided in the package.
6. Secure front of rail to the front RETMA column using the provided flat securing screw/guide
pin in the bottom screw position of the rail.
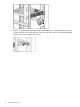
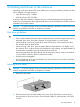
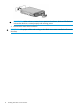
7. Slide the enclosure into position on the rails (1). Secure the chassis into the rack by tightening
the captive CTO screw behind the latch on the front left and right bezel ears of the chassis
(2).
CAUTION: The front CTO screw must be attached at all times when racked.
Racking the disk enclosure 13