
Chassis Install Instructions (734751-001, March 2014)


For protection against a power-source failure, obtain and include two uninterruptible power
supplies in your installation.
For power consumption specifications, see the QuickSpecs for your disk enclosure model.
Consider using the HP Simple Configurator Evironment (SCE) to help plan and configure racks and
rack-mountable devices. The SCE is available on the HP website: http://h22174.www2.hp.com/
SimplifiedConfig/Index
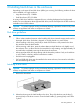
Racking the disk enclosure
The disk enclosure can be installed into most standard server racks. To verify that your rack is
supported for use with the disk enclosure, see the QuickSpecs for the disk enclosure at the HP
website:http://www.hp.com.
CAUTION: Install disk drives in the enclosures only after mounting the enclosures in the rack.
• A disk enclosure populated with disk drives is too heavy to lift safely.
• Movement of a disk enclosure during installation might damage the internal storage media
of installed disk drives.
Rack installation best practices
In addition to industry-standard recommendations, consider the following:
• Locate the heaviest items, such as uninterruptible power supplies (UPS) and additional disk
enclosures near the bottom of the rack.
• To make cabling easy, install the disk enclosures below the server.
• Install similar components next to each other in the rack. Because disk enclosures, switches,
and servers are of differing depths, if you have more than one of a device, mount those devices
adjacent to one another to accommodate working behind the rack.
WARNING! To reduce the risk of personal injury or damage to the equipment, be sure that:
• At least two people lift the storage system during removal or installation if the weight exceeds
22.7 kg (50 lb). If the system is being loaded into the rack above chest level, a third person
MUST assist with aligning the system with the rails while the other two people support the
weight of the system.
• The leveling jacks on the rack are extended to the floor.
• The full weight of the rack rests on the leveling jacks.
• The stabilizing feet are attached to the rack if it is a single-rack installation.
• The racks are coupled together in multiple-rack installations.
• Only one component in a rack is extended at a time. A rack might become unstable if more
than one component is extended.
• To prevent damage and to ease insertion of the device into the rack, support the weight of
the device and keep it level when sliding it into the rack.
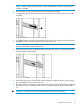
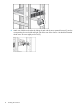
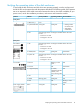
Racking procedures
1. Position left and right rack rails at the desired 'U' position in the rack, adjusting the rails to fit
the rack, as needed.
Front and Rear bottom edge of rails must align with the bottom of EIA boundary in the lowermost
'U'
12 Installing the enclosure