
HP StoreOnce Conversion from 2.x.x software to 3.4.x (or later) Software Guide (BB852-90949, November 2013)

7. Remove the Flash Memory stick (1) and store safely, in some cases a Velcro™ tie will need
to be unfastened to remove the stick. (It is not recommended that this USB stick is used for the
3.x.x install image.)
NOTE: The memory module for the HP StoreOnce D2D4112/4106 and the HP StoreOnce
D2D2502/2504 has a cable. It should not be necessary to remove this. If you do so, first
unscrew the bracket (2) holding the USB connector and then disconnect the cable from the
motherboard (3).
8. Replace the lid and re-rack the appliance.
9. Re-attach cables and a keyboard and monitor.
HP D2D4312/4324 only, reconfiguring 1GbE ports
For D2D4312 and D2D4324 systems you will need to reconfigure the 1GbE network connections
in order to be able to use the network after 3.x.x system software is installed.
To do this:
• Remove the blanking plugs from the lower two 1GbE network ports on the network card in
the PCIe slot of the server
• Remove any connected network cables from the upper two 1GbE network ports and re-locate
them to the lower ports. Make sure that the lower port (Port 1) is used because this will be the
default port that will be enabled in DHCP mode after installation completes. The following
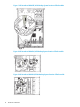
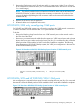
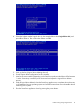
figure illustrates an HP D2D4312 Backup system; the 1GbE port configuration is the same for
an HP D2D4324 Backup system.
Figure 4 HP StoreOnce D2D4312/4324 Backup System location of 1GbE network ports
LAN port 2 connector (1GbE)2LAN port 1 connector (1GbE), connect for easy
install
1
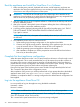
HP D2D4106/4112 and HP D2D2502/2504 1GbE ports
No reconfiguration is required for these ports, but make sure that the lower port (Port 1) is connected
because this will be the default port that will be enabled in DHCP mode after installation completes.
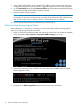
Figure 5 HP StoreOnce D2D4106/4112 Backup System location of 1GbE network ports
HP D2D4312/4324 only, reconfiguring 1GbE ports 15