
HP StoreOnce Conversion from 2.x.x software to 3.4.x (or later) Software Guide (BB852-90949, November 2013)
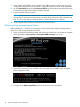

7. Insert a blank 4GB USB key when prompted. This USB key must not contain any previously
configured Linux partitions, it may contain a single FAT32 partition which will be overwritten.
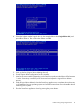
8. On the Select Media page choose Browse for ISO file and locate the downloaded QR image.
Choose the drive letter of the USB key media to be used.
9. Proceed with the USB Key creation.
NOTE: The process takes several minutes to complete the creation. During this process the
HP USB Key for Windows tool may report (not responding) and the file copy animation may
stop. This is normal, and you should continue to wait for the process to complete.
10. Once complete safely remove the USB stick from the Windows PC.
Delete existing storage logical drives
Before installing 3.x.x. software it is necessary to remove previously configured storage logical
drives, this is done using the Smart Array boot.
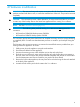
1. Power on the StoreOnce Backup system and wait for the initial Power On self tests to complete.
When prompted to Press any key to view Option ROM messages press a key.
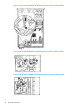
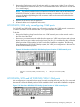
2. Wait for the first Smart Array controller to be discovered and press F8 to enter the Option
ROM configuration utility.
3. Navigate to the Delete Logical Drive option from the main menu and select it.
18 Software Installation and configuration