
HP StoreOnce 4900 (44TB) and (60TB) Capacity Expansion guide


3 Installing and cabling the HP StoreOnce 4900 60TB
Capacity Expansion
Always refer to your rack documentation and to the Safety Guide and the Installation and
Configuration Guide on the HP StoreOnce Backup CD for detailed instructions, including important
safety information, about installing units within the rack.
This chapter describes how to install the HP StoreOnce 4900 60TB Capacity Expansion. Unlike
the pre-configured storage, additional storage must be licensed, discovered and added to the
StoreOnce Backup system before it is available for use. Please note that there is a different license
for the 44TB and the 60TB Capacity Expansion. The 60TB license is required to be added for this
expansion. See Applying the License and Completing the RAID Expansion (page 19).
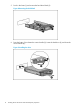
The recommendation is to locate the second disk enclosure below the HP StoreOnce 4900 head
server, so that both disk enclosures are below the head server. This is because the disk enclosures
are very heavy and locating the heaviest items in the bottom part of the rack helps ensure rack
stability and minimize the amount of lifting required during installation.
It may be necessary to move the head server unit higher up in the rack so that you can install the
disk enclosure in the recommended location.
IMPORTANT: If you choose to install the disk enclosure above the head server, it is recommended
to install a 1U support shelf immediately above the head server unit to protect it from the weight
of the disk enclosure.
Important safety information
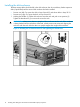
WARNING! The disk enclosure with no drives installed weighs 72.58 kg (160.00 lb). With all
drives and components installed, the enclosure can weigh up to 145.15 kg (320 lb). To reduce
the risk of personal injury or damage to the equipment:
• Observe local occupational health and safety requirements and guidelines for manual material
handling.
• Use caution and get help to lift and stabilize disk enclosures during installation or removal,
especially when the disk enclosure is not fastened to the rack.
CAUTION: Use extreme caution when installing and pulling units from the rack; they can slip
and fall, causing damage to the HP StoreOnce Backup system or injury. HP is not responsible for
any damage or injury caused by the mishandling of the HP StoreOnce Backup system.
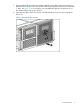
Installing the rails and locking nuts
The rack rails are marked for easy identification. The left rack rail is marked "L" and the right rack
rail is marked "R." To install the rack rails:
Determine where the second disk enclosure will be installed and install the rails and locking nuts,
as follows:
1. Begin with the left rack rail. Align the end of the rail with the rear rack column.
2. Slide the rack rail closed until the end of the rail is locked in place, wrapping behind the rear
rack column.
3. Slide the front end of the rail to the rack front column. When fully seated, the rack rail will
lock into place.
14 Installing and cabling the HP StoreOnce 4900 60TB Capacity Expansion