
HP Store Once Backup System 2700, 4500 and 4700 Installation and Configuration Guide

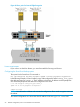

8 Completing the installation
This chapter describes common tasks required after installation.
• Set the time and date and NTP server, if this was not done as part of the system set
config wizard. See also Setting up time and date (page 59).
• Apply any licenses for additional capacity, replication, StoreOnce Catalyst or Security features,
if required. See Configuring licenses (page 60).
• Discover and add storage for any expansion shelves that have been added, see Expanding
storage (page 61).
• Understand how to access the StoreOnce Backup system over SFTP, see Accessing the
StoreOnce Backup system over SFTP (page 62).
• Install any software updates, if needed. See Software update process (page 63).
• Configure Remote Support. See Configuring Remote Support (page 64).
• Configure SNMP, if required. See Configuring SNMP (page 71).
• Perform a configuration save. See Saving configuration file (page 71).
• Reset the password for the HPresetpassword account and save the new password securely
offline. See Managing and resetting the password for the HPresetpassword account (page 72).
For other tasks, such as user account configuration, email configuration, and device configuration
for backup/replication targets using VTL, NAS or StoreOnce Catalyst refer to the HP StoreOnce
Backup system user guide.
IMPORTANT: Some earlier products were shipped with StoreOnce software version 3.8.0. It is
essential to update the product to StoreOnce software version 3.9.0 as soon as possible after the
hardware has been installed and the network configured. Some features, such as the Security Pack
and Instant On licenses, are not available with StoreOnce software prior to 3.9.0. See Software
update process (page 63).
Setting up time and date
NOTE: HP strongly recommends setting the time and date when configuring the network using
the system set config wizard. This section describes how to do this if you have not used the
wizard.
1. Open the puTTy (or other ssh) application and log into the StoreOnce CLI.
2. Make sure you know what the UTC time is and then set the system clock using the following
command:
time set utc <mm/dd/yyyy hh:mm:ss>
TIP: If defining an NTP server, still set UTC because this will result in a quick synchronization
with NTP.
3. Set the time zone using the following command:
time set timezone
You will be asked to select a continent/ocean and country as part of the command sequence.
4. If you have defined an NTP server, enter its IP address or FQDN using the StoreOnce CLI
command:
time add ntpserver <IP address or FQDN>
Setting up time and date 59